Some of the screenshots below may be too hard to read on this page so just click an image to open a full-sized version.
Where To Set Up A Free Business Email Account
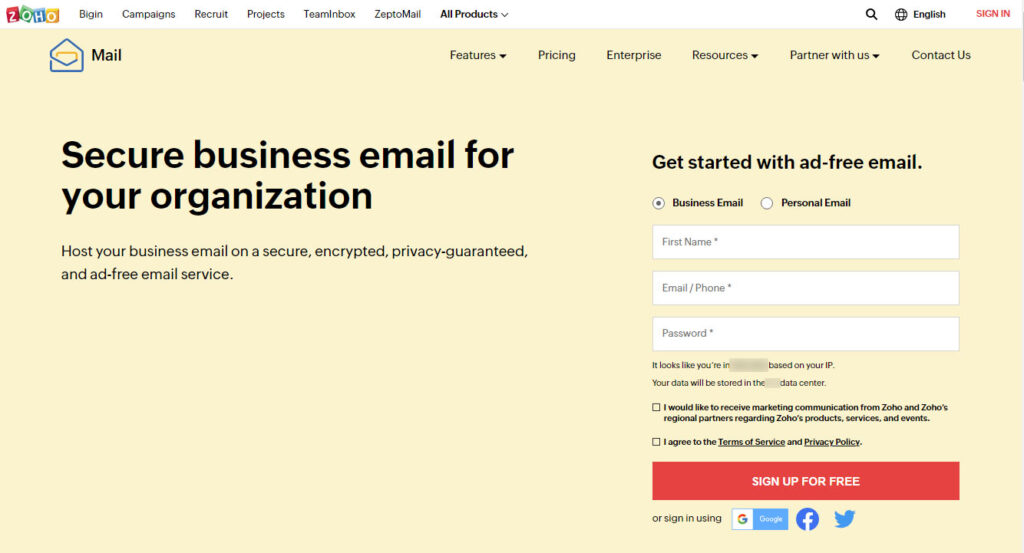
In order to set up a free business email account, first head over to Zoho Mail:
The default option on the page is Business Email so that’s what I went about setting up.
I entered my First Name, one of my Gmail email addresses and created a new Password which will be used later to log into the email account.
NOTE: You need to enter an active email address into the Email/Phone box as a verification code will be sent to you there. Without the code you can’t proceed any further in creating a business email account.
I initially entered my phone number in the Email/Phone box but hit a couple of issues:
- On a couple of occasions when I tried to have the verification code sent to me, Zoho said my phone number was already in its database and it wouldn’t send me text messages; this is true as I have set up other business email accounts on Zoho.
- On a couple of other occasions, Zoho said the verification code had been sent to my phone but I never received those texts.
Using an email address in the Email/Phone box, you get your verification code almost instantly, so that’s what I recommend you do if you want to create your own business email address.
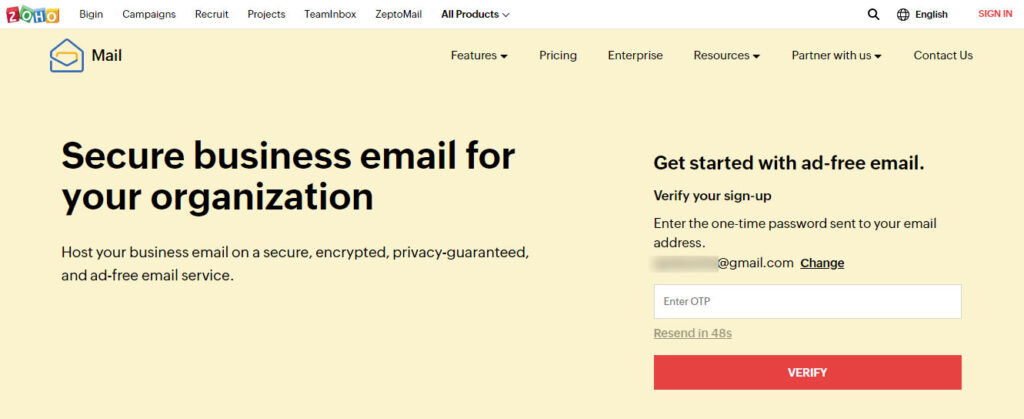
Once I got through the signup page, I was redirected to the Verification page:
I copied the code that Zoho sent to my email address, pasted it into the Enter OTP box and clicked the Verify button.
Once verified, I was taken to Zoho’s pricing page:
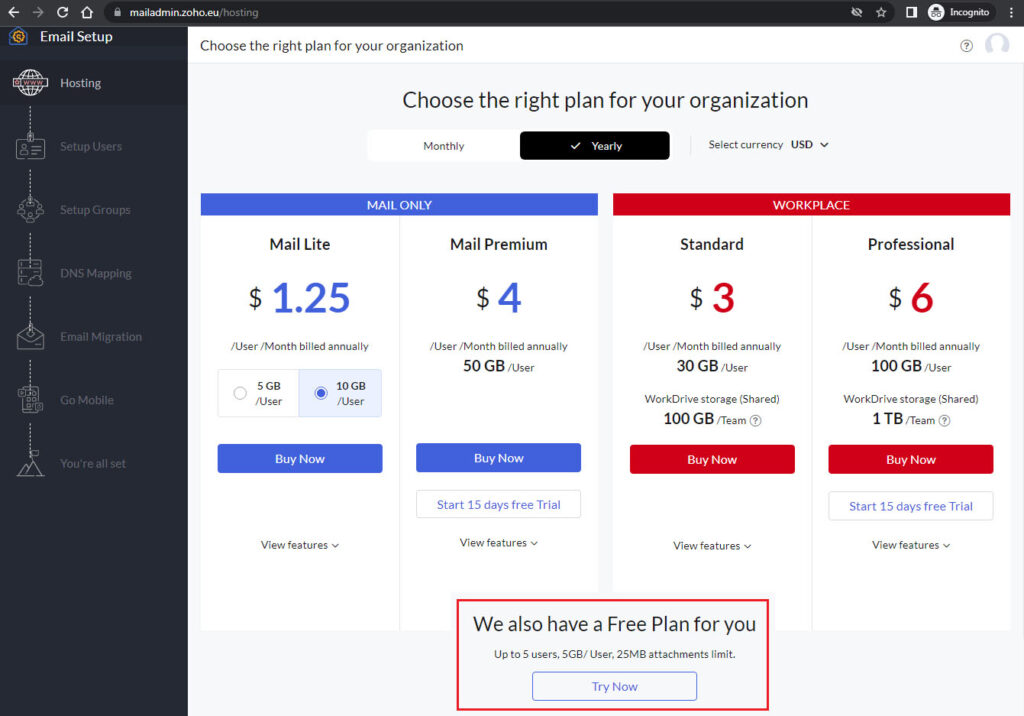
The prices shown are the equivalent monthly prices if you pay yearly.
I won’t bother showing the pricing options for paying monthly as I’m not interested in a paid plan.
Down at the bottom of the Pricing page is the Free Plan option (highlighted in a red box above) which has more than enough resources and storage.
Don’t be misled by the Try Now button – there’s no trial period involved and you don’t have to enter any credit card or other payment info.
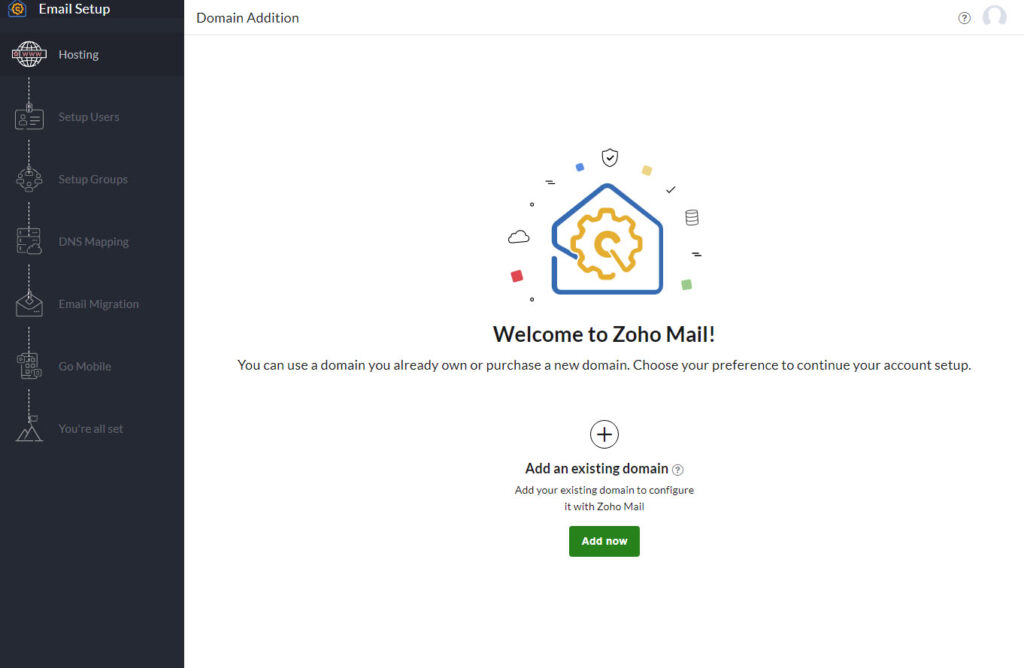
Once I clicked the Try Now button, the Welcome page appeared:
Choosing The Domain Name For My Business Email Address
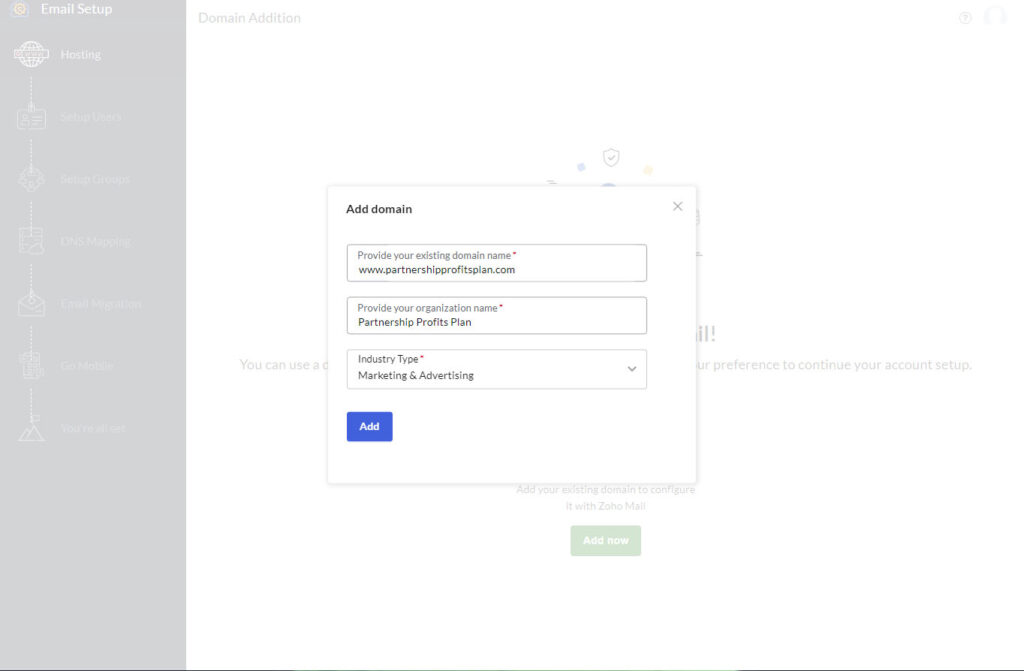
The next thing to do was to add a domain name on which I wanted to create a business email address, so I clicked the green Add Now button and this window popped up:
I added in my domain name – partnershipprofitsplan.com, picked an Organisation Name for the account (Partnership Profits Plan seemed appropriate) and then selected a suitable Industry Type from the dropdown.
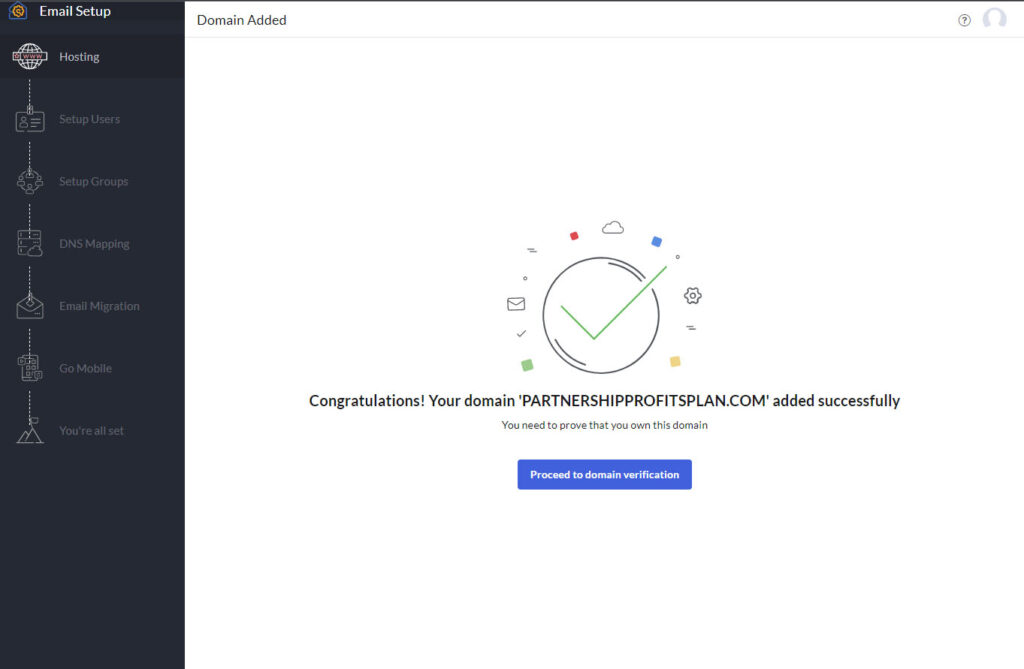
After clicking the Add button, this page appeared:
Verifying That I Own The Domain
The next step was to verify the domain.
Verification here is about showing Zoho that you are the owner of the domain and that you’re not some hacker who’s trying to create a spam email account on someone else’s domain.
I clicked the Proceed to domain verification button.
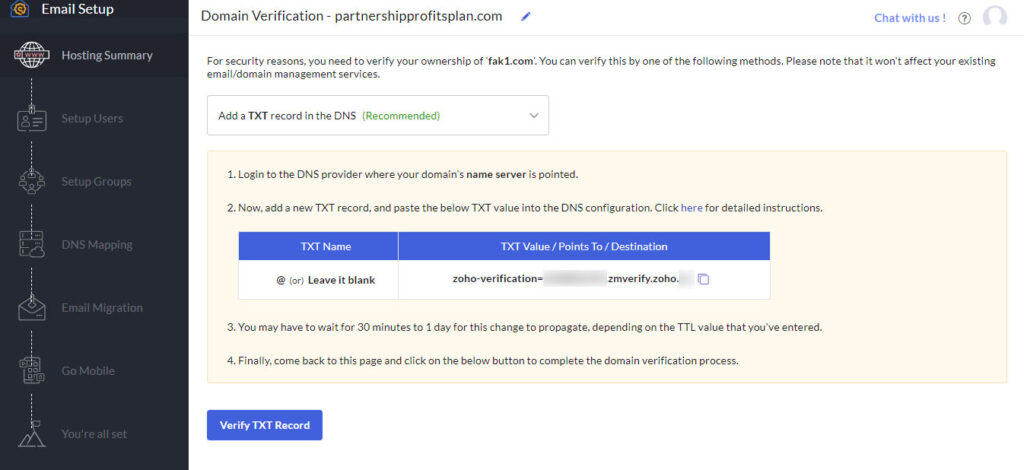
That brought me to this page (some info blurred out for security reasons):
This page showed a TXT record that needed to be added to the DNS Settings page for my partnershipprofits.com domain, over on my domain registrar – Dynadot.
This record is how Zoho verifies you are the owner of the domain since you’re the only one who should have access to the domain settings for your domain.
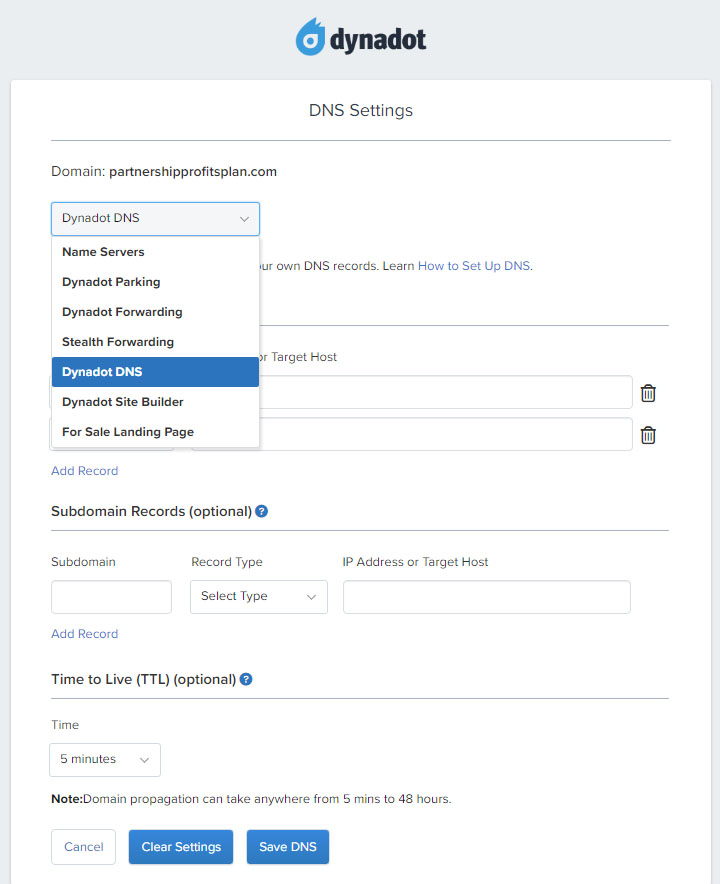
So I headed over to Dynadot, logged in and opened the settings page for my domain.
The default page there seems to be Name Servers, so I selected the Dynadot DNS option from the dropdown menu to open the DNS Settings for my domain.
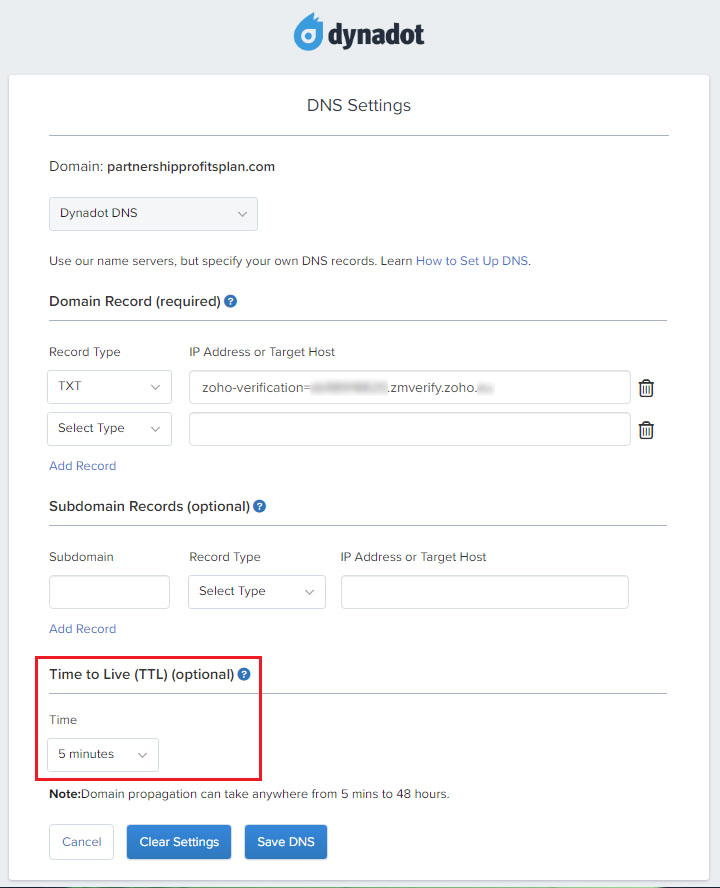
In the following image below, you can see that I copied and pasted the TXT record provided by Zoho into the Domain Records settings for my domain (I’ve blurred out some parts for security reasons).
I selected the TXT Record Type, as recommended by Zoho, and pasted the verification text into the IP Address or Target Host box.
You’ll see that I’ve highlighted the TTL setting in the image below.
This is essentially how long routers have to wait before they update the local DNS settings they’ve stored (the shorter the TTL period, the faster the record updates happen).
Dynadot defaults to using the lowest TTL (Time To Live) period which, in this case, is 5 minutes, but it can still take a record change like this for a domain up to a day to propagate across the internet.
This “propagation” is separate from routers being updated though.
Each time a DNS record is updated, your domain registrar will notify certain internet servers about the change.
They then relay that change to other servers they’re connected to and, over time, every server on the internet gets alerted to your DNS update.
Once a server gets the update, routers connected to it will then also get the update.
And the TTL period determines how long they hold onto the old record values for before updating locally.
A DNS update typically takes much less than a day to ripple across the internet but sometimes it can be slow.
If you’re using a different domain registrar, it may use a different default TTL setting. so make sure to use the lowest value allowed as that will speed up how quickly the record change takes place.
Once I’d made the changes, I clicked the Save DNS button to save them and then I had to wait until these changes rippled across the internet so that all the servers that form the backbone of the internet know about the change.
As it turned out, I only had to wait a few minutes before my DNS change was recognized by Zoho.
When I clicked on the Verify TXT Record button on their page, the page updated to this:
Creating The Actual Business Email Address
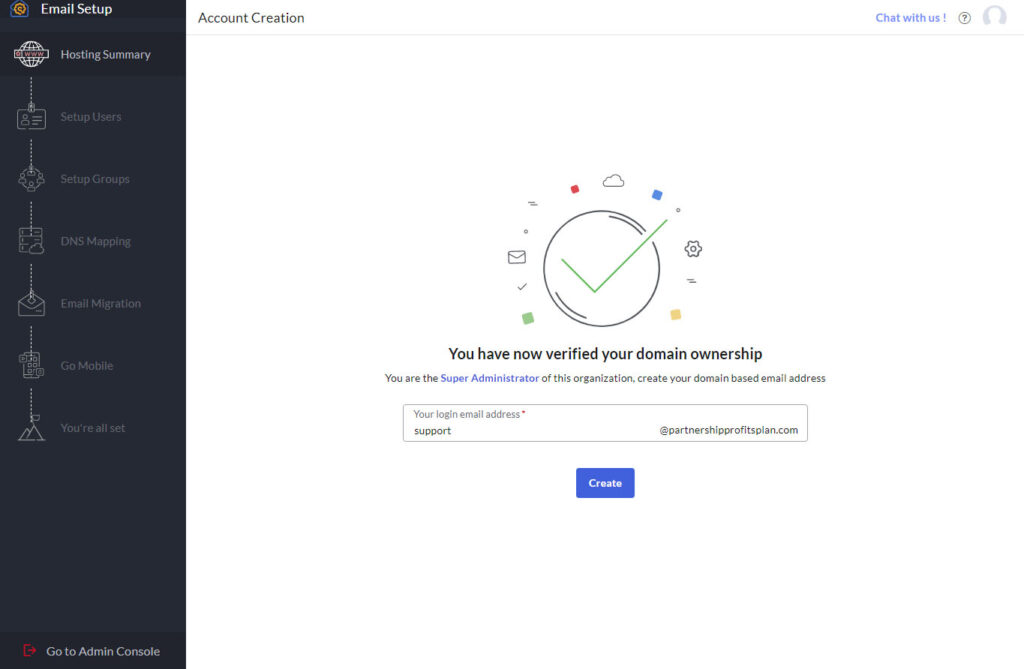
I then typed support into the box on the page because I wanted to create the ![]() email address and account (on Zoho) and clicked the Create button.
email address and account (on Zoho) and clicked the Create button.
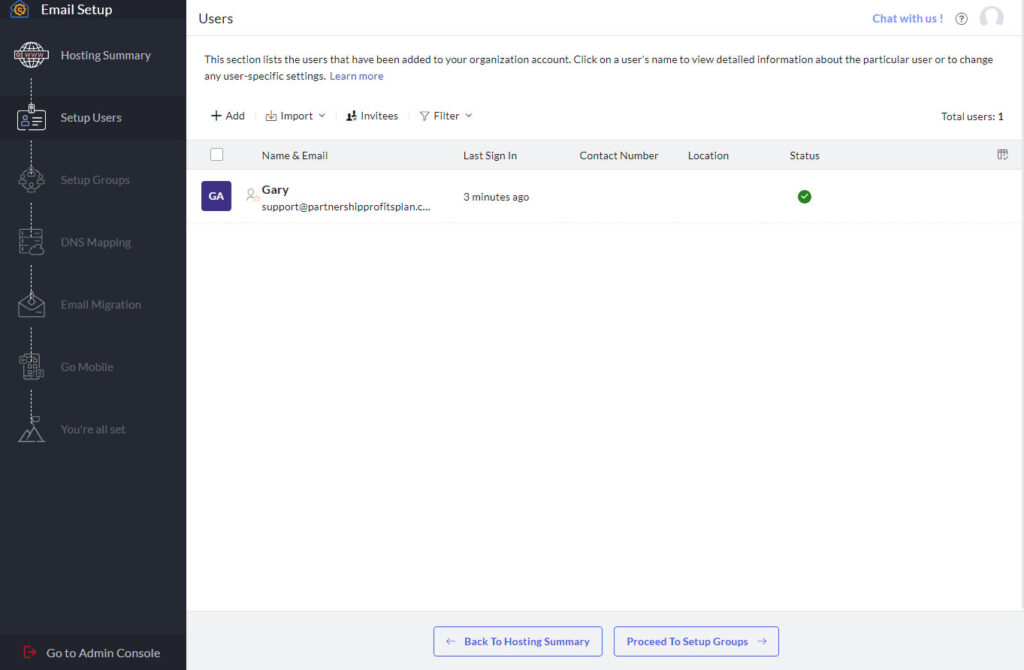
Once the account was set up, I was taken to this page:
Since all I was interested in was creating an email account, I ignored all the options on the left below Setup Users and clicked on the Go To Admin Console option instead.
This then resulted in a popup asking me if I wanted to finish Email setup later to which I answered Yes.
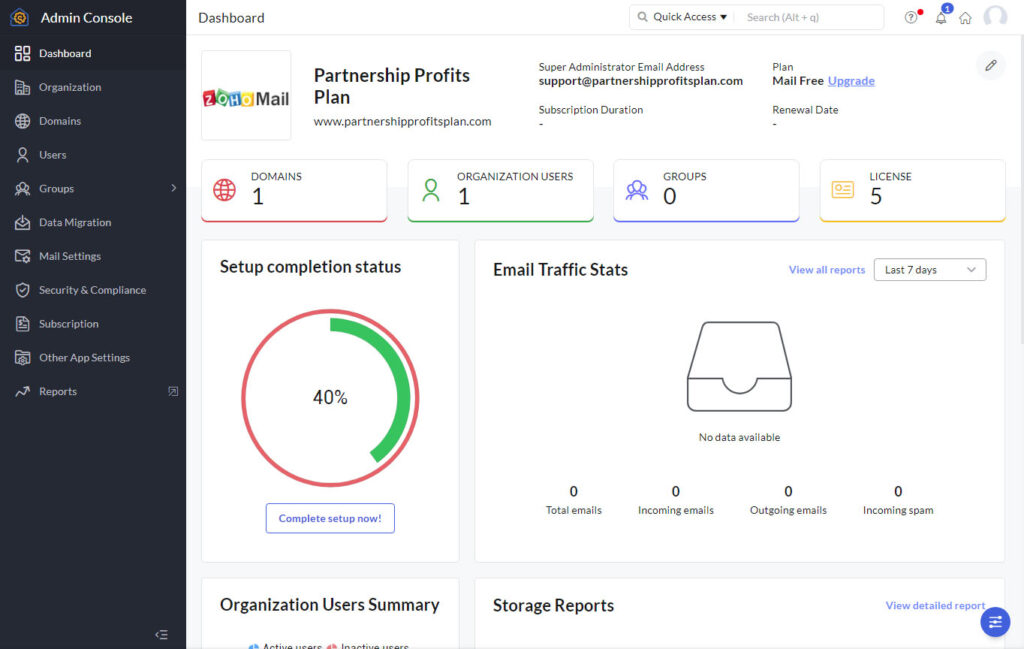
I then got redirected to this complicated looking console page:
At this stage, while the business email account has been set up on Zoho, the account was not yet in a position to send and receive emails.
That required that some more DNS settings were changed.
Setting Up The DNS Records For The Email Account
See that 1 in the blue circle over the bell at the top right of the image above?
That’s a message that alerts you that MX records still need to be set up for your domain on your domain registrar.
I clicked the Bell icon and that brought up this notice that overlaid the page:
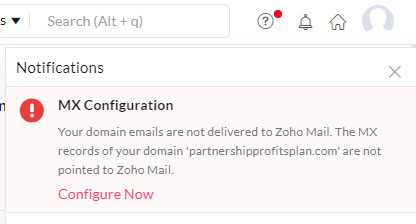
I clicked the Configure Now link as directed and that brought me to this page (some info blurred for security):
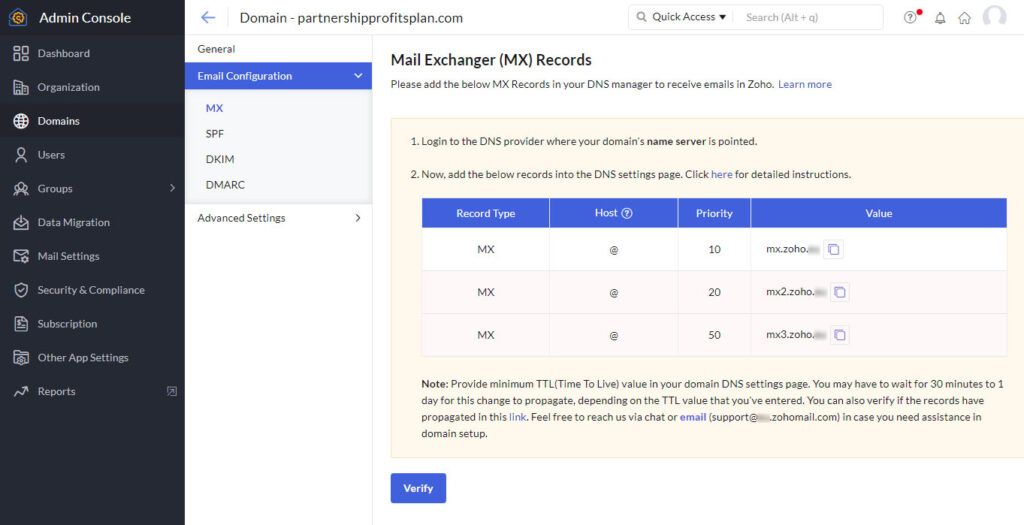
There were 4 types of records that needed to be added to the DNS Settings for my domain over on my domain registrar (Dynadot) – MX records, an SPF record, a DKIM record and a DMARC record.
Setting up all these authenticates you as a real person as opposed to some bot and increases the likelihood that your marketing emails will end up in the recipient’s Inbox rather than their Spam/Junk folder or in the Promotions tab (in GMail).
So they’re definitely worth setting up.
It’s not complicated – it’s just a matter of copying and pasting lines of text and clicking some Verify buttons to make sure the changes have gone through correctly.
Setting Up The MX Records
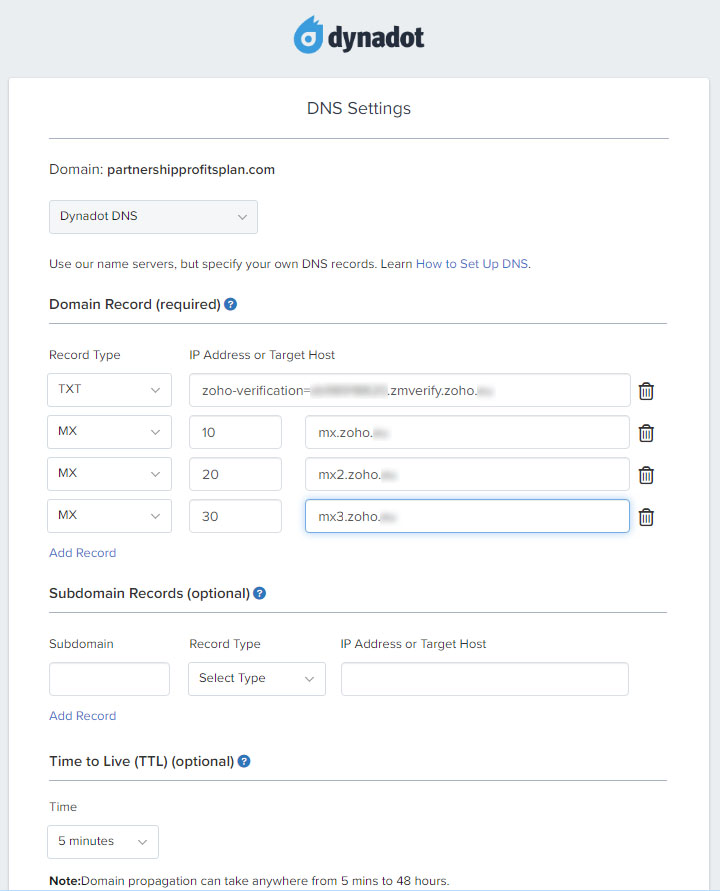
I started by copying the three MX records into my DNS settings:
…and then clicked the Save DNS button at the bottom of the page.
NOTE: Dynadot does not require that you enter the @ (Host) part of MX records. If you’re doing this on a different domain registrar, then you may have to include the @ in the records settings.
I waited a few minutes before clicking the Verify button on the Zoho page (2 images up) to check that the changes had gone through.
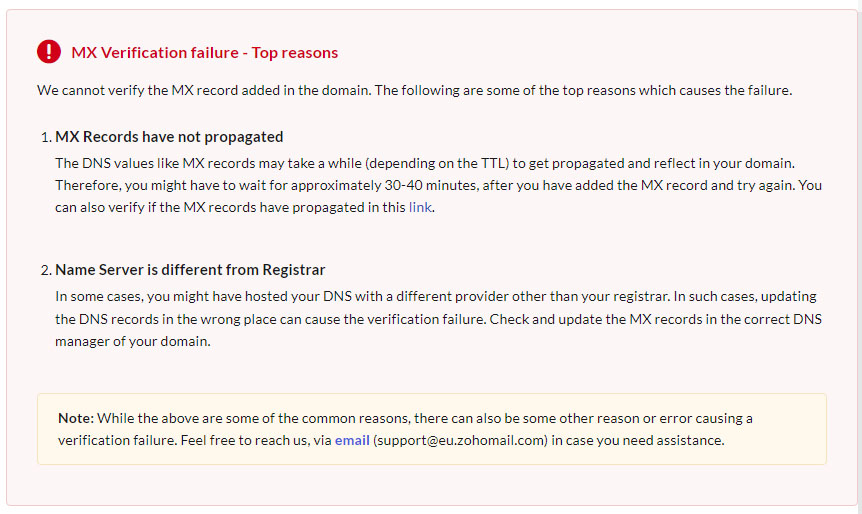
I initially got this error:
It just meant that I needed to wait a bit longer for the changes to propagate.
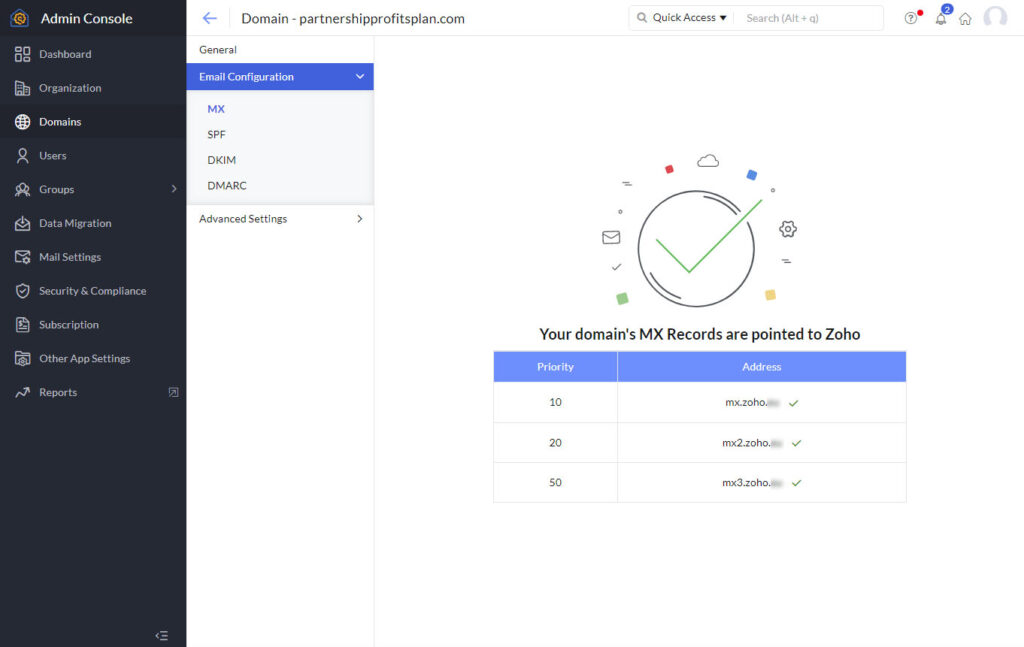
In fact, I had to wait several hours before I finally saw this result when I clicked the Verify button again:
Setting Up The SPF Record
Next up was to set up the SPF record.
The Sender Policy Framework (SPF) is an email-authentication technique which is used to prevent spammers from sending messages on behalf of your domain.
SPF records include a list of IP addresses and domains authorized to send emails from that domain.
Together with the DMARC related information (see below), this gives the person or system that receives your emails information on how trustworthy the origin of your email is.
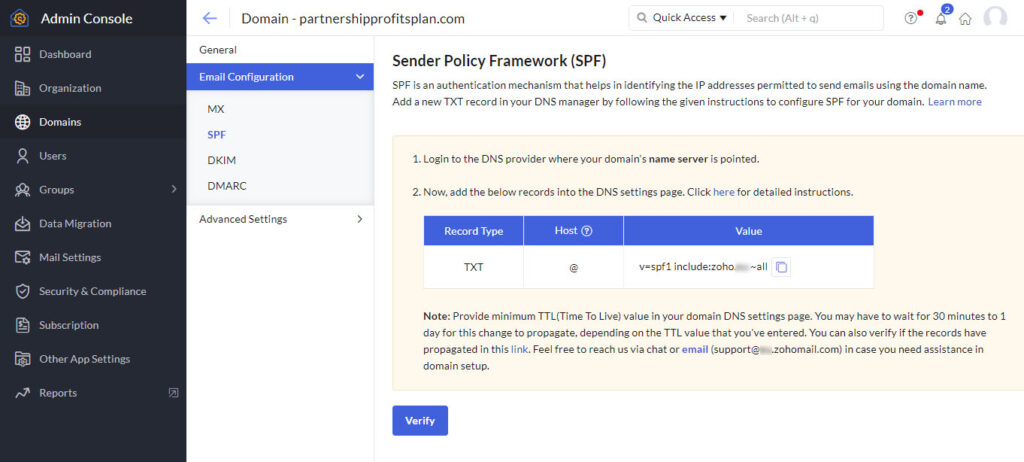
To get the SPF record, all I had to do was click the SPF option in the menu on the page and this appeared:
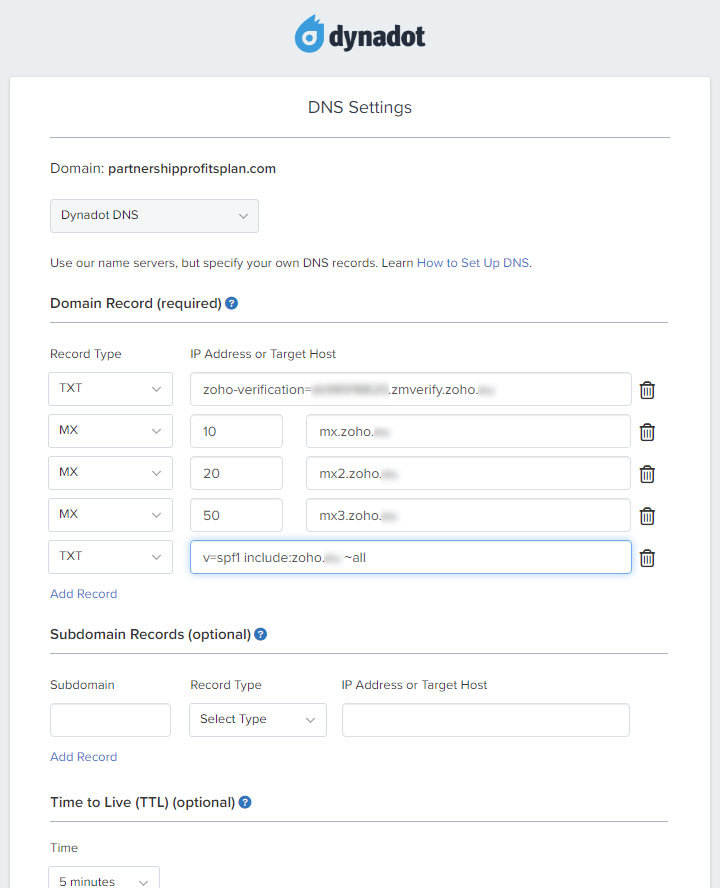
All that’s required to set this up is to add a new TXT record to the DNS settings for my domain and to copy & paste the text from the Value box above into my DNS Settings and save the change:
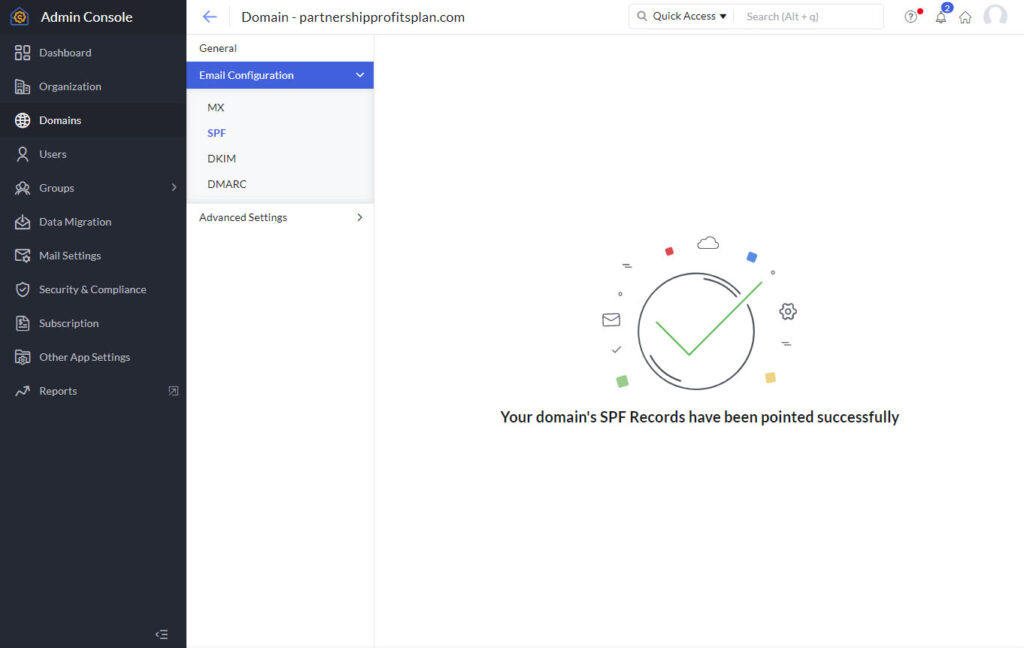
This update only took a couple of minutes to go into effect and when I clicked the Verify button on the Zoho page, this message appeared:
Next in line to be taken care of was the DKIM record.
Setting Up the DKIM Record
DomainKeys Identified Mail (DKIM) is an email authentication method that’s used to prevent email spoofing (i.e. someone pretending to be you by hijacking your email address).
It increases email security by allowing the receiving mail server to check the authenticity of the sender’s (your) domain.
The DKIM record is a modified TXT record that adds cryptographic signatures to your emails.
You add a DKIM record into your DNS Settings which contains public key cryptography used by the receiving mail server to authenticate a message.
While nearly 85% of all emails go to the spam folder(!), DKIM can prevent your email from doing so by providing cryptography authentication.
It also prevents hackers from altering your email messages in transit (for example, swapping out your affiliate links for theirs) or forging your email account for malicious activities.
So this setting is one of the most important to use and set up.
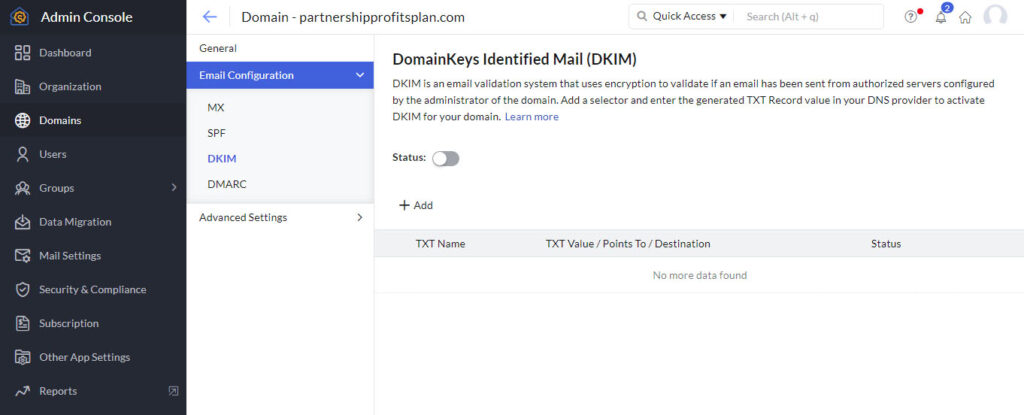
Once I clicked on the DKIM option in Zoho, this is the page that popped up:
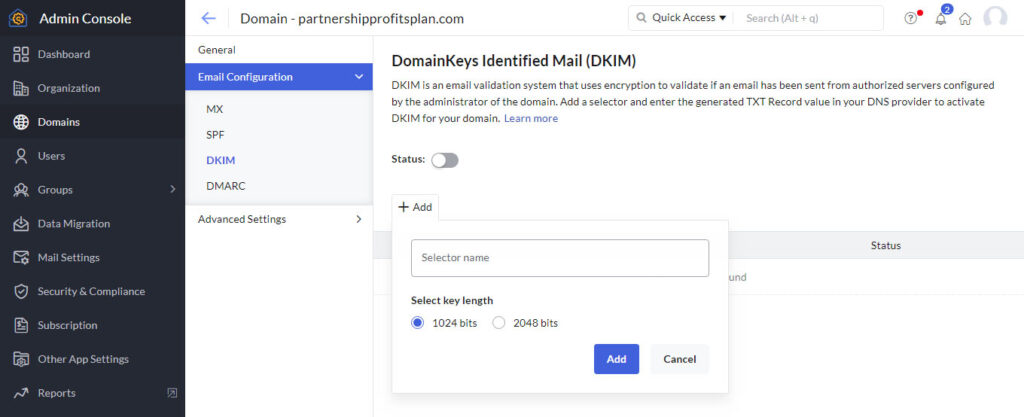
The first thing I had to do was click in the + Add link on the page which brings up this box (notice that the DKIM Status is currently disabled):
You can name the Selector (as it’s called) whatever you want but make sure you keep a copy of the name in case you ever need it again in the future.
For added security, I selected the 2048 Bits Key Length rather than using the default 1024 Bits.
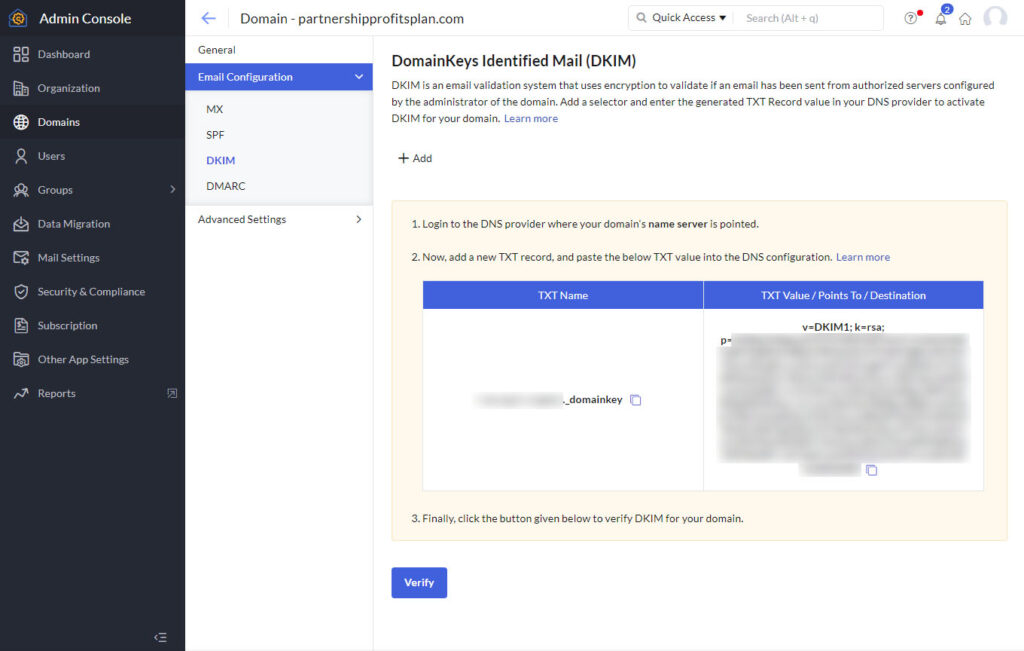
NOTE: You cannot use spaces or underscores in selector names but you can use dashes. There may be other characters you’re not allowed to use as well. You might need to try a few selector names before one is accepted and, when one is, the Zoho page will update to this:
Obviously, I’ve blurred out the sensitive information in the screenshot for security reasons.
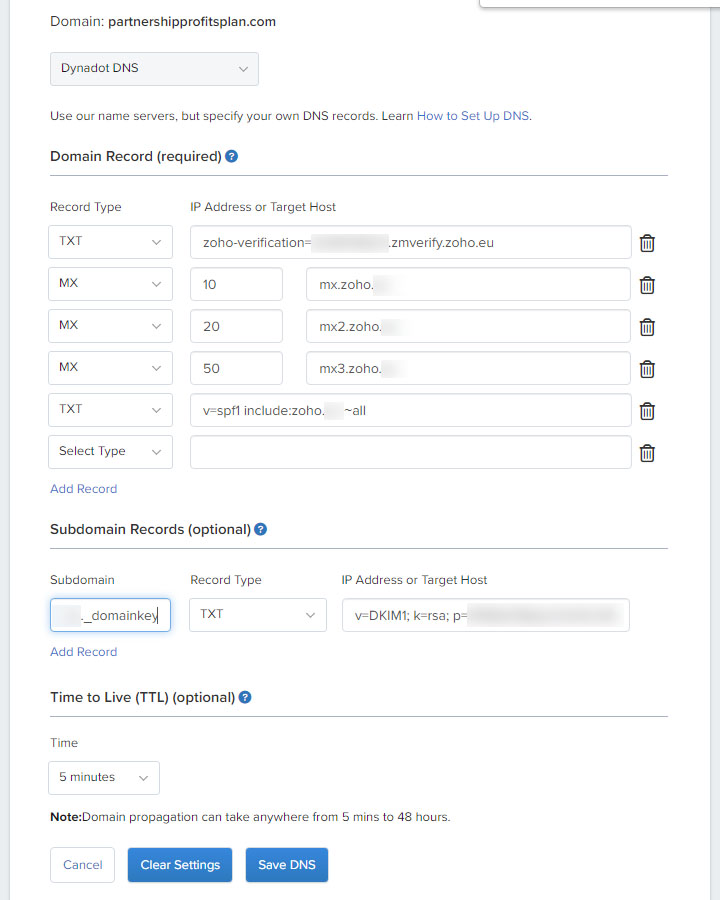
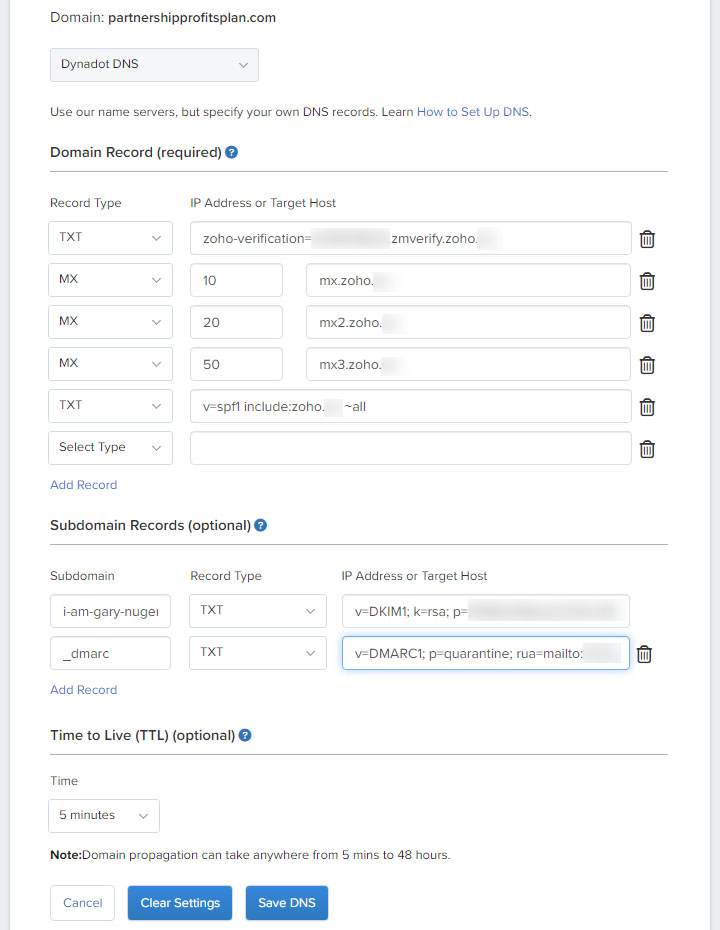
On Dynadot, I had to add the DKIM record into the Subdomain Records section on the DNS Settings page (your domain registrar may have a different way of adding the record):
I copied the DKIM TXT Name from the Zoho page and pasted it into the Subdomain box in the Subdomain Records section of Dynadot’s DNS Settings page.
Next, I selected the Record Type as TXT.
Then I copied the TXT Value/Points To/Destination encoded text from the Zoho page and pasted it into the IP Address or Target Host box on Dynadot.
Finally, I clicked the Save DNS button to save the change.
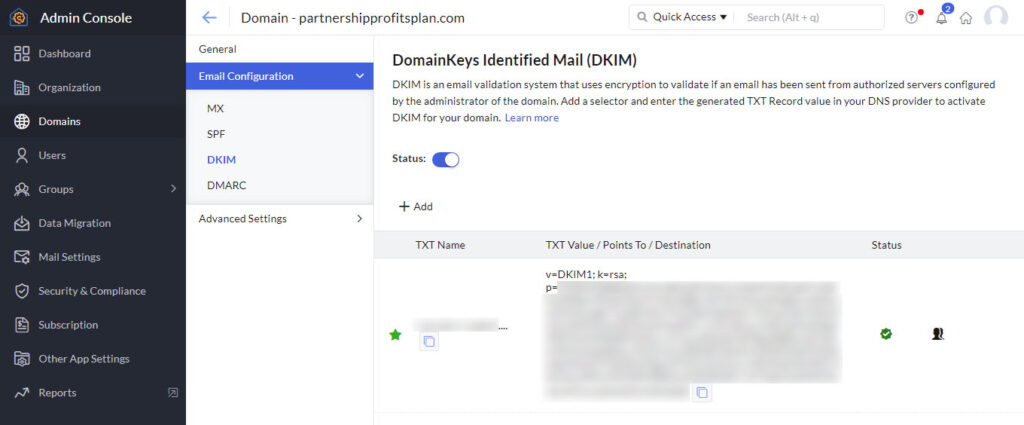
Again, it only took a few minutes for this record change to go through and clicking the Verify button on the Zoho page showed this update:
As you can see, the Status for the record is now enabled (blue rather than grey) and there’s a green tick icon in the Status column for the DKIM record itself.
So all ok.
Time to proceed with the final record setup for DMARC.
Setting Up The DMARC Record
Domain-based Message Authentication Reporting and Conformance (DMARC) is a method of authenticating email messages.
A DMARC policy tells a receiving email server what to do after checking a domain’s Sender Policy Framework (SPF) and DomainKeys Identified Mail (DKIM) records, which are additional email authentication methods.
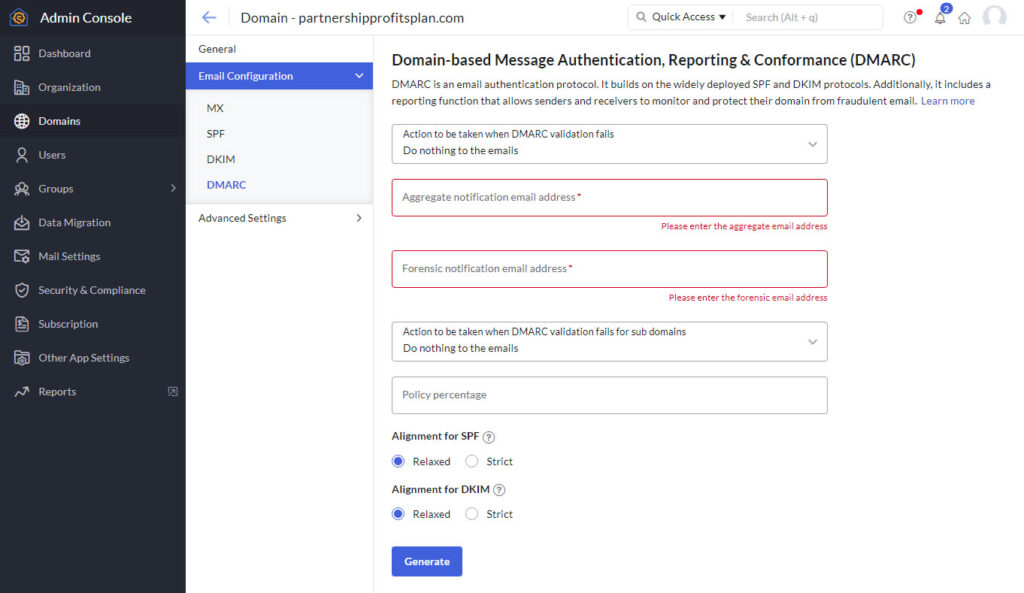
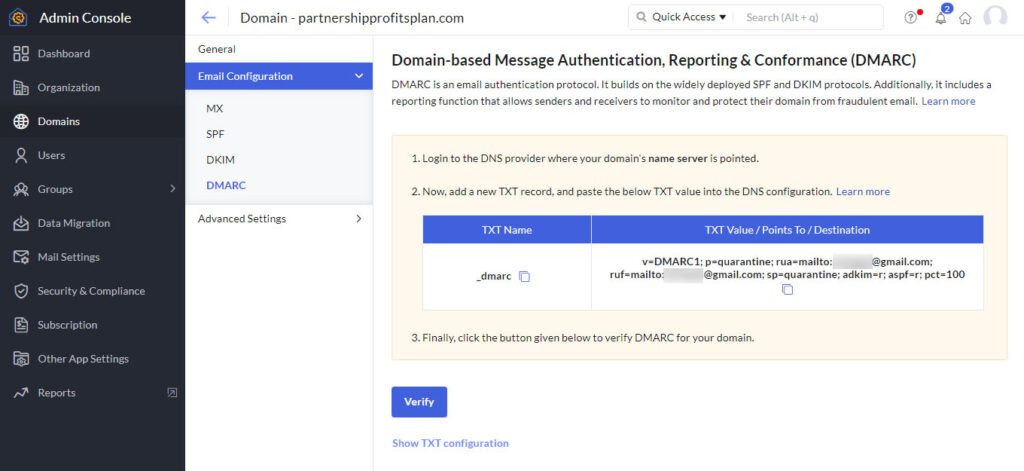
Once I clicked on the DMARC option in the menu, this is the page that appeared:
It looks daunting but it’s not.
The first dropdown gives you options on what to do with any emails that are generated as a result of DMARC validation failures.
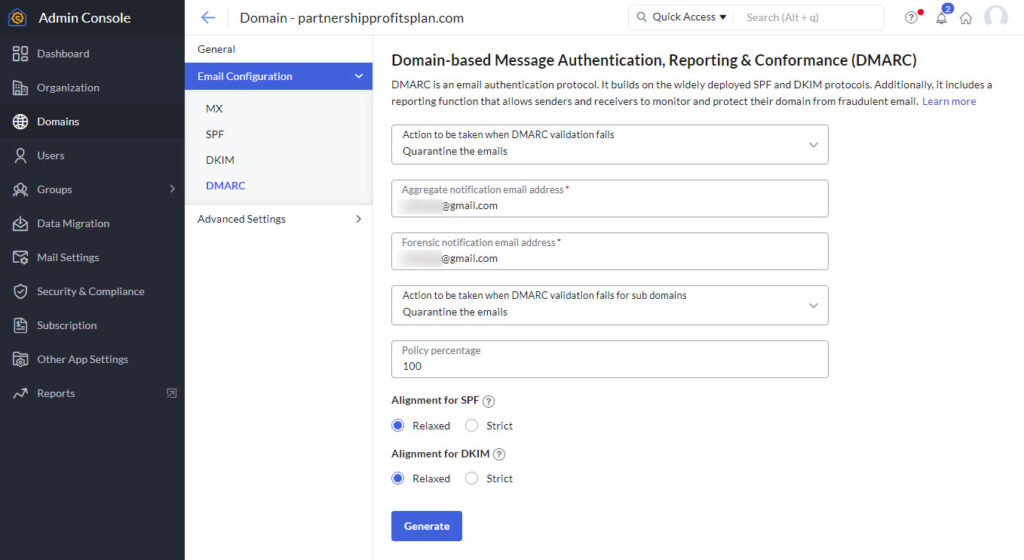
Rather than using the default option to ignore such emails, I selected the option to Quarantine the emails.
I used the same email address in both the Aggregate notification email address and Forensic notification email address boxes.
These are one or more of your email addresses where the Aggregate and Forensic reports will be sent to.
I used a Gmail address I regularly check for these rather than the business email address I set up on Zoho itself.
These reports will contain information about when your Zoho email address is compromised or attempts to compromise/hijack it.
They’re very useful for troubleshooting and will help Zoho identify and solve problems should they happen, but that’s unlikely if you set up all the previous DNS records.
I also set the Action to be taken when DMARC validation fails for sub domains option to Quarantine the emails just in case a hacker manages to do something with subdomains for partnershipprofitsplan.com.
There’s a tiny chance of something like this happening but I’d rather know about it if it does than just ignore it.
The Policy Percentage is the percentage of emails to which the DMARC validation policy is to be applied.
The recommended value is 100(%), so that’s the figure I used.
I left the Alignment for SPF and Alignment for DKIM options at their default values.
So this is what my DMARC page looked like:
All that was left for me to do was to click the Generate button which then took me to this page:
Again, I copied and pasted the TXT Name and TXT Value/Pints To/Destination texts into the Subdomain Records section of the DNS Settings page for my domain on Dynadot, as you can see here:
This record change was quickly processed too and took only a couple of minutes.
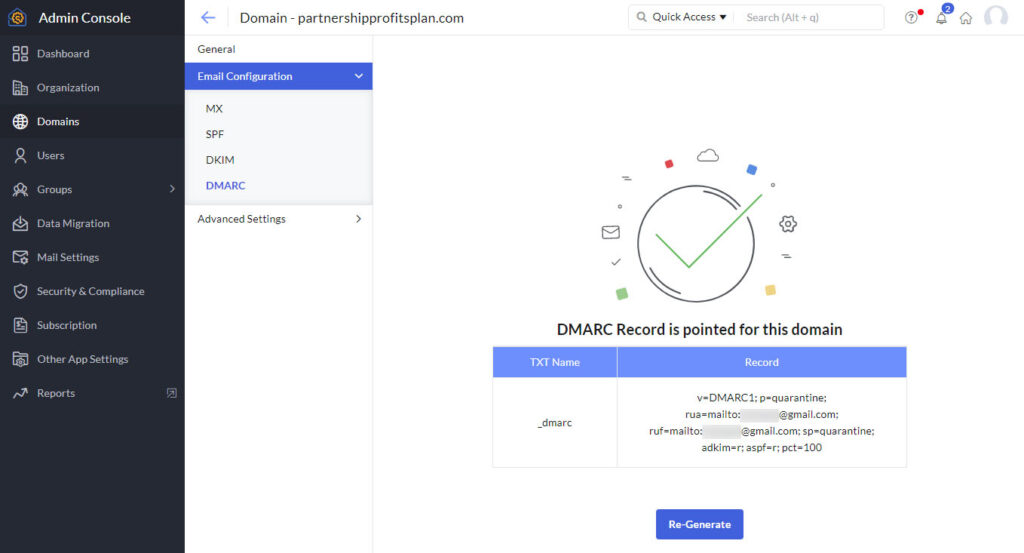
Once I clicked the Verify button on the Zoho DMARC page, this confirmation screen appeared:
No Advanced Settings Changes
I didn’t change any of the Advanced Settings via the link below the General menu.
I’d only look at changing those if someone does manage to use my new business email address despite all the authentication and validation measures I already put in place.
So that completes the business email setup on Zoho.
Final Check
The last thing to check was that my new business email account was actually working correctly.
So I sent an email from my Zoho business email to one of my gmail addresses and , yes, it did arrive.
I then replied to that email and the reply did land in my Zoho email account.
So the professional business email address has been set up correctly and is working as it should.
Job done! ![]()
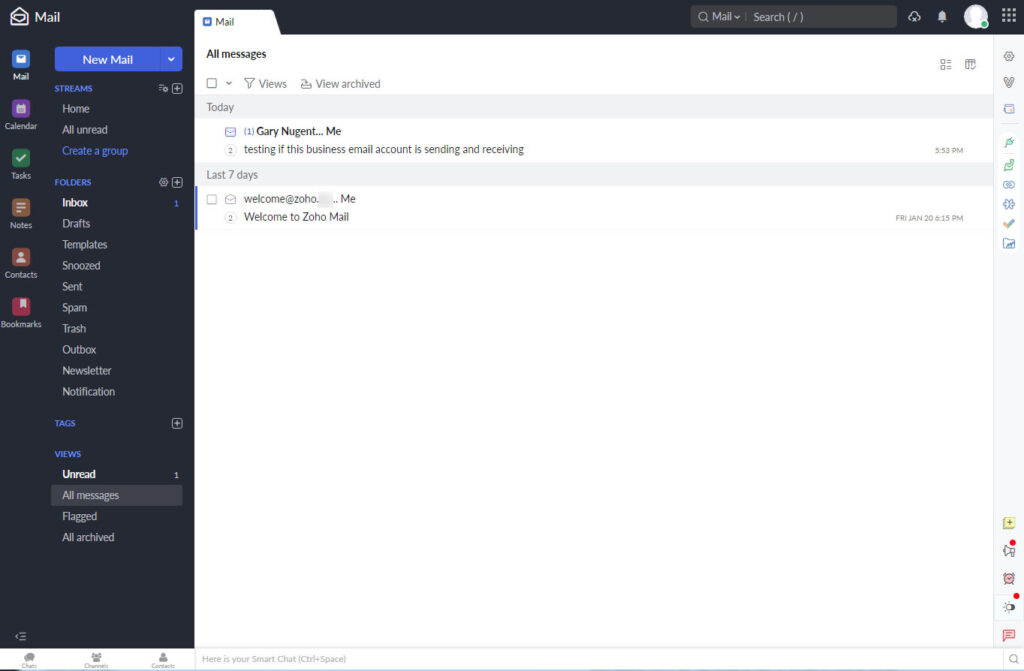
Here’s what the email dashboard/console looks like with the test email I sent and the reply I also sent in the Today section:
A Couple of Notes
It’s not obvious how you open the email dashboard when you’re in the Admin Console (as you are when getting the info for setting up the DNS records).
At the top right of the Admin Console, there are 4 icons.
Click the ![]() icon to switch to the email dashboard.
icon to switch to the email dashboard.
To return to the Admin Console, first click the Avatar icon to the left of the 9 small boxes icon at the top right of the Email Dashboard.
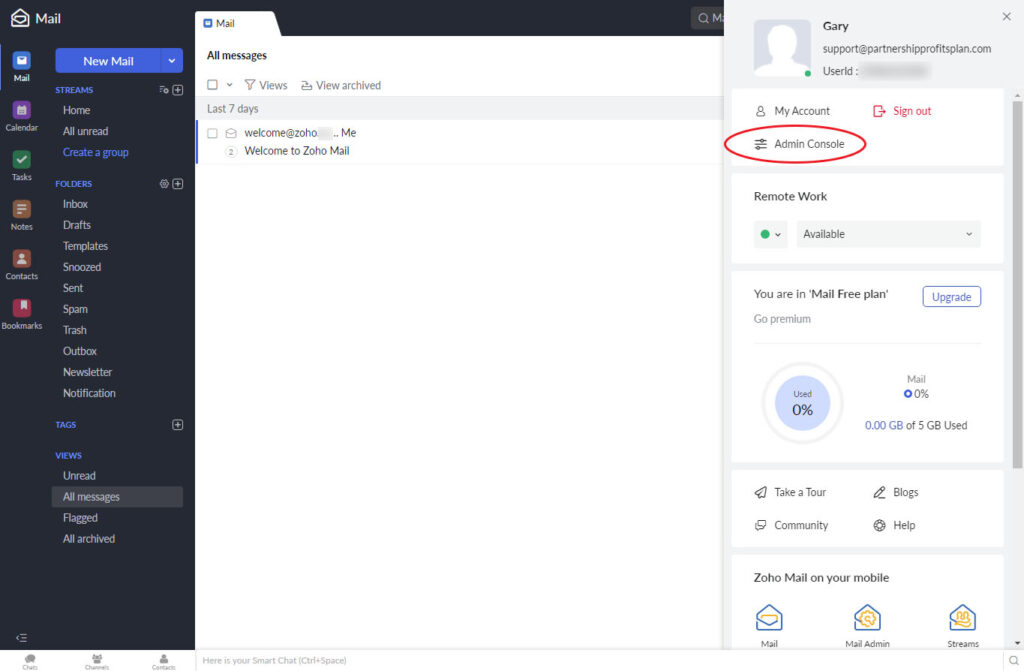
This will open a sidebar like this:
Click the Admin Console link in the sidebar (circled above) to switch to the Admin Console.
Closing Thoughts

While it took me a few hours to compile this article to document my progress and to create all the screenshots, the actual process of setting up a business email address on Zoho doesn’t take that long.
There are several stages to go through to make your business email address as robust as possible, but most stages simply require copying information that Zoho gives you and pasting that into the DNS Settings page for your domain over on your domain registrar.
The things that generally take the most time are when verifying when records have been added.
In some cases that can take a few hours but, in general, new records are verified within just a few minutes.
This whole procedure is something you only ever have to do once.
There are no settings to be tweaked and the DNS records are not something you need to keep an eye on in the future.
This is a set-it-and-forget-it process.
I’ve documented setting up the DNS records at my own domain registrar – Dynadot.
If you follow this process with a different registrar, how you add the DNS records might be a little different but should still be simple.
If you feel you’re not technically minded enough to set up a business email yourself, or you don’t want or have the time to put into, I can do the setup for you for $25.
There will be no ongoing fees as there is when creating a business email account on Google Workspace (formerly GSuite) or if you use the email services provided directly by your domain registrar.
Anyway, think it over.
I think I’ve covered enough in this post and it’s already more than long enough!
So in the next post in this series I’ll look at getting set up on Systeme and starting to promote it as my first affiliate product/service.
Related Posts
- How To Get Started With Affiliate Marketing (the initial idea)
- How To Get Started With Affiliate Marketing: Day 1 (preliminary work)
- Affiliate Marketing Ideas – How To Get Started With Affiliate Marketing: Day 2 (progress and problems)
- Affiliate Marketing Ideas – How To Get Started With Affiliate Marketing: Day 3 (fallout from Day 2 problems)
- Affiliate Marketing Ideas – How To Get Started With Affiliate Marketing: Days 5-19 (creating the lead capture funnel)

All the best,
Gary Nugent
Check out my Instagram posts and reels here:
Follow me (@aiaffiliatesecrets) on Instagram
P.S.: Don't forget, if you want to create an internet income of your own, here's one of my recommended ways to do that:


