
UPDATE April 18, 2020: Conversion Gorilla has been discounted from $99 per year to a single $19.95 payment for Lifetime access.
In this Conversion Gorilla review, I’m going to look at a tool that you can use to build your lists from web pages that you don’t own but share, particularly on social media.
We tend to think of list building as something we primarily do by driving web traffic to our sites where we either have an opt-in form in the sidebar, at the bottom of posts or on a dedicated squeeze page.
Conversion Gorilla can be used as an email list building software tool though that’s not really its primary function.
My Conversion Gorilla Overview
Program Owners: Promotelabs
Ease of Use: 98 out of 100
Support: 98 out of 100
Usefulness of Tool: 80 out of 100 (Basic Edition)
95 out of 100 (Upgraded Edition)
Price:
EmailListBuildingTechniques.com Rating: 92 out of 100 (Basic Edition)
97 out of 100 (Upgraded Ed.)
What Is Conversion Gorilla?
Ok, the tool was created to convert people into buyers or subscribers. It does this by adding what’s called an Attention Bar to the top or bottom of a web page.
Attention Bars are nothing new. They’re frequently used on websites to alert visitors to special offers, deals, time-sensitive or limited offers or to provide discount coupons.
They work. And they convert people into customers.
Conversion Gorilla adds an opt-in form into the mix. It’s not the first Attention Bar to provide this feature but other attention bar tools only provide the opt-in feature.
As far as I’m aware, Conversion Gorilla is the only tool that provides all types of Attention Bar in one place.
Now the tools I’ve mentioned above will add bars to your own website and pages.
What’s special about Conversion Gorilla is that not only does it allow you to add Attention Bars to your own pages, but you can add bars to ANY web page on the internet (you do need to buy an upgrade to access this feature).
Let the possibilities of that sink in.
How many web pages have you shared on your Facebook timeline, on Google Plus, in Instagram, on Twitter and elsewhere?
Conversion Gorilla’s main function is to allow you to put offers in front of people who you share web pages with.
You can also put opt-in forms in front of those people and have them subscribe to your list from a page owned by someone else.
How cool is that?
In case you think there’s anything underhanded going on here, there isn’t.
Nothing is being done to the destination web page. It’s not being hacked by the tool in some way. No code is being injected into it.
What happens is that the tool creates a new web page which contains the Attention Bar and then embeds the destination page on the attention bar web page.
So the page you share is not actually the final destination web page but the page you create in Conversion Gorilla itself.
An Example Should Clarify Things
So here’s an example which should clear things up if you’re still hazy on how the tool does its thing.
Let’s say that I want to spread the news that the fantastic sci-fi show The Expanse has been canceled by the Sy Fy Channel. I’ve found this post that talks about the series’ cancellation:
https://www.hollywoodreporter.com/live-feed/expanse-canceled-at-syfy-1110985
Now, you’d normally just paste a link like this into your social media accounts to spread the news.
Instead, what you’d do is create a new page in Conversion Gorilla. I’ve done that as a demo and this is the page I created:
https://conversiongorilla.link/o/865/3439/
When you click that link, you’ll see the Hollywood Reporter post and the Attention Bar will appear at the top of the post.
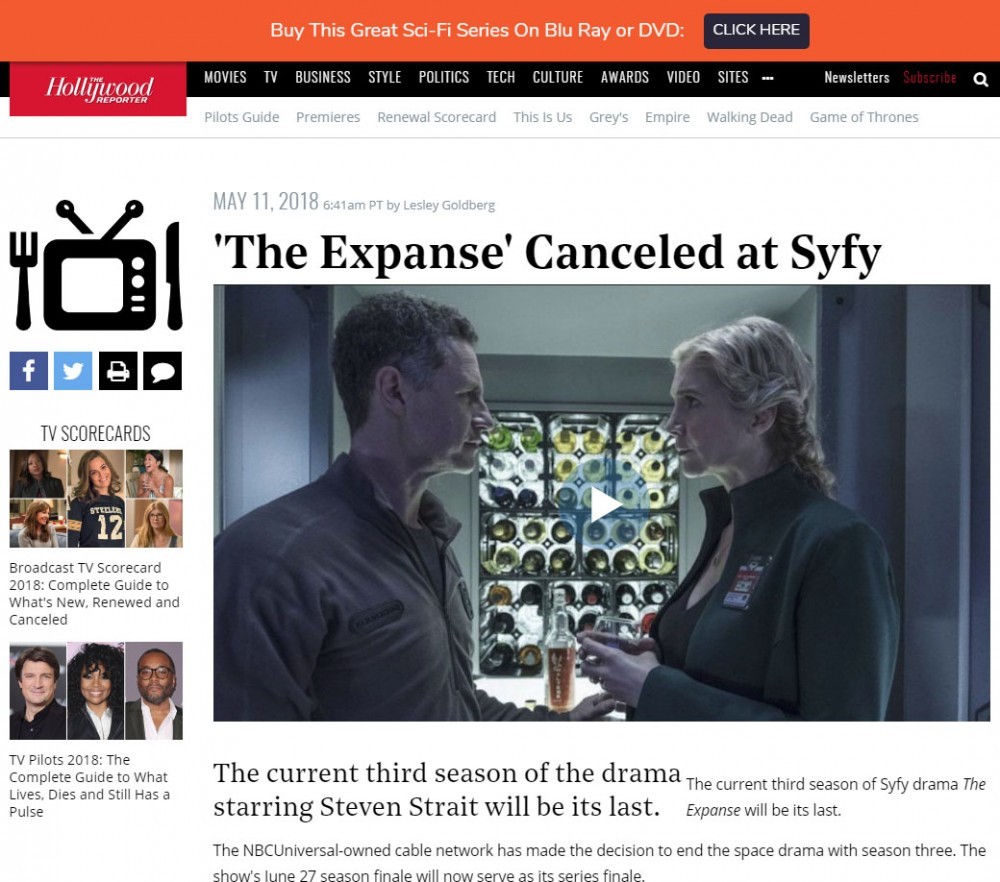
As the visitor scrolls down the page, the bar stays fixed at the top of the page (you can change this), unless the visitor clicks the X in the bar to close it.
Clicking the button on the bar takes you to the Amazon page for the Blu-Ray and DVD of the series.
So this is the link you would share.
Anyone who visits your page will see your attention bar at the top of the page and the main article below that.
Now, in this second example, I’m sending people to the same Hollywood Reporter page but this time I’m adding an opt-in form to the bottom of the page to ask visitors to sign up for an Entertainment Alerts mailing list (this isn’t a real list, btw).
https://conversiongorilla.link/o/865/3441/
Click the button on the bar and you’ll see the opt-in form appear.
If I wanted, I could send traffic to both pages to see which one got the better response and then pick the winner and promote only that (that’s known as split testing).
Now I hope you can begin to see the power of this tool.
Hosting Your Conversion Gorilla Pages
You’re probably wondering where your pages are hosted and if there are any hosting fees involved.
The good news is that you do not need to pay any web hosting fees. All the pages you create with Conversion Gorilla are hosted for free on Promotelabs’ servers (the developers of the tool).
So, even if you don’t already have your own website, you can still use this tool to create these pages. And it won’t cost anything extra.
I have to point out that should Promotelabs ever go out of business, you’ll likely lose access to all your pages and they’ll stop working. But that’s a long shot. Promotelabs have been around for years and they are constantly releasing new tools.
The Actual Conversion Gorilla Review
So now that I’ve explained what the software does and given two demos of it in action, it’s time to take a more detailed look at it, its various options and how useful it really is.
Conversion Gorilla is a web-based tool so you can use it anywhere you can use a browser.
The tool costs $99 per year a one-time $19.95 fee for Lifetime access and, from my perspective, is great value for money.
You can create an unlimited number of pages with it, so you’re not limited in any way by the low fee.
Once you log into the tool, your Dashboard will look something like this (click the image for a full-sized view):

Bar Name is the name you’ve given to a bar. I find it’s best to mention the destination page here so you know what the bar is for months down the line.
Type lists the type of attention bar you’ve created.
Link Clicks is how many times the button on your bars have been clicked.
Email Optins shows how many people have filled in the opt-in and submitted their info. Non-zero numbers will only appear in this column for Opt-In (Email) attention bars.
Total Views is how many times each of your bars have been seen.
Unique Views is the number of individuals who have seen your attention bars. This should always be lower than Total Views as some people may revisit the page.
Actions are the buttons that allow you to pause bars, edit them, preview them, clone them, get your page links, reset the stats for a bar or delete it.
Across the top of the page are other self-explanatory options.
Types of Attention Bar Available
Conversion Gorilla can create 5 types of bar:

Create A Simple Message Bar To Grab Some Attention… creates a single-line message bar with no buttons. This type of bar would be used to display a message about your site or maybe a coupon code.
Boost Conversions With A Video CTA Bar… creates a taller bar that can contain two lines of text, a video and a Call To Action (CTA) button. This is a good choice if you have a video that talks up a product. Especially useful during the launch phase of a product.
To add a video, all you need to do is paste in its web address. So you can use videos from YouTube, Vimeo, Vooplayer, Wistia, Screencast, etc. You can also paste in the web address for mp4 video files, if you have some uploaded to your own site (or elsewhere, if you know the address).
Drive Traffic/Visitors To Any Site, Page Or Offer… is probably the most used option in the software. There are 3 options available:
- Standard Bar which has a single line of text and a button
- Feature Bar which has two lines of text and a button
- Hero Bar which also has two lines of text and a button but in this case, the button appears below the two lines of text, not to the right of the text as in the Feature Bar.
Collect Their Email And Build Your Subscriber List… has the same 3 options – Standard Bar, Feature Bar and Hero Bar as above but once the button is clicked, the optin form scrolls out. This option is an upsell, available for a flat $27.
Create A Social Bar To Encourage Sharing… is a more limited option. It has one line of text and a single social share button for Twitter, Facebook, LinkedIn, Google Plus, Pinterest, Buffer, Reddit, Tumblr, Pocket or Skype. This option is an upsell, available for a flat $17.
You cannot have multiple share buttons on this bar so you need to pick the best social site you want your content shared to.
These 5 options and their sub-options allow you to create any type of Attention Bar that you’ll need.
Before you go about creating any opt-in attention bar, you need to enter your autoresponder‘s API key into the Lead Machine setting on your Account Tab:
 Once you do that and Save, Conversion Gorilla will be integrated with your autoresponder and you’ll be able to select what list you want a subscriber to be added to when you build your own opt-in attention bars.
Creating An Attention Bar
Since there are so many different bars that you can create, for the sake of brevity and this Conversion Gorilla review, and that the topic of this entire site is list building and email marketing, I’ll show the process of creating an opt-in bar so you get an idea of what’s involved.
In this example, I’m going to create a Standard Bar (one line of text) with slide out form. Once that option is selected, this is the page you’ll see:
Appearance Tab:

Here you enter the name of your attention bar and select the text and background colors (defaults to white text on an orange background).
The bar can be a solid color or a gradient. If you select the Gradient option, Start Color and End Color boxes replace the Bar Color box. Using a gradient fill can give your bar a three-dimensional look.
Dropshadow will add a shadow under your bar so that it appears to float above the background page.
Opacity sets the transparency of the bar if you want the background page to be partially visible through the bar.
In the example above I opted to use a gradient bar with a drop shadow and no transparency.
At the bottom of the image is a preview of how the bar looks.
Settings Tab:

The Settings tab allows you to set up the behavior of your bar.
The Bar Position can be Top or Bottom (I chose bottom here).
Scroll Mode can be Follow (the bar scrolls off the page as the visitor scrolls down the page) or Fixed (the bar remains fixed to the top or bottom of the page). I prefer using the Fixed setting on my bars.
Push Mode can be Overlay (the bar is displayed over the background page) or Push Down (the bar pushes the background page down so none of the background page is obscured). I prefer using the Pushed Down setting on my bars.
Bar Trigger sets when your bars appear. That can be instantly, after a set number of seconds, after the visitor scrolls a certain percentage down the page or only on exit intent – when the visitor goes to leave the page.
Visitor Sees Bar sets how often the bar will be seen by a visitor. This can be Every Visit, Once Per Day, Once Per Week or Never Again (i.e they see the bar only once).
The Never Again option would typically be used with a short countdown timer where they’re told they have just one chance to take up your offer or they’ll never see it again.
Lock Bar sets whether a visitor can close the bar (No) or not (Yes).
You can also filter your traffic and display your bar ONLY if a visitor comes from specific web address (URL).
Countdown Tab:

Countdown timers are frequently used to trigger a FOMO (Fear Of Missing Out) response in visitors so that they feel more compelled to take up the advertised offer.
There are three Countdown options: None, Date/Time and Evergreen.
For my demo opt-in form, I selected the None option but I wanted to give you some idea of what this tab looks like when you select one of the other countdown options.
The tab allows to you to control how a timer behaves. You can change the text and background colors and set what the attention bar will do once the timer hits zero.
With the Date/Time countdowns, when they run down to zero, bars can be automatically hidden, they can redirect to another web address, display a simple message like “You missed out!” or can automatically have extra time added to the countdown.
Evergreen timers will simply restart at whatever countdown period you set for them once they reach zero.
Button Tab:

This is where you set up your button. The Button Type can have Square or Rounded corners.
Text and background colors can be set as usual.
The Animate option lets you select an animation to apply to your button. This animation repeats endlessly so might be distracting or annoying for your visitors. I usually leave this at the default None setting.
Finally, there’s your Button Text. You can only enter a maximum of 25 characters here so you need to keep your button text – your Call to Action – short and pithy.
Opt-In Appearance Tab:
It’s important to note that this tab is only available if you buy the Lead Machine Upgrade for Conversion Gorilla.
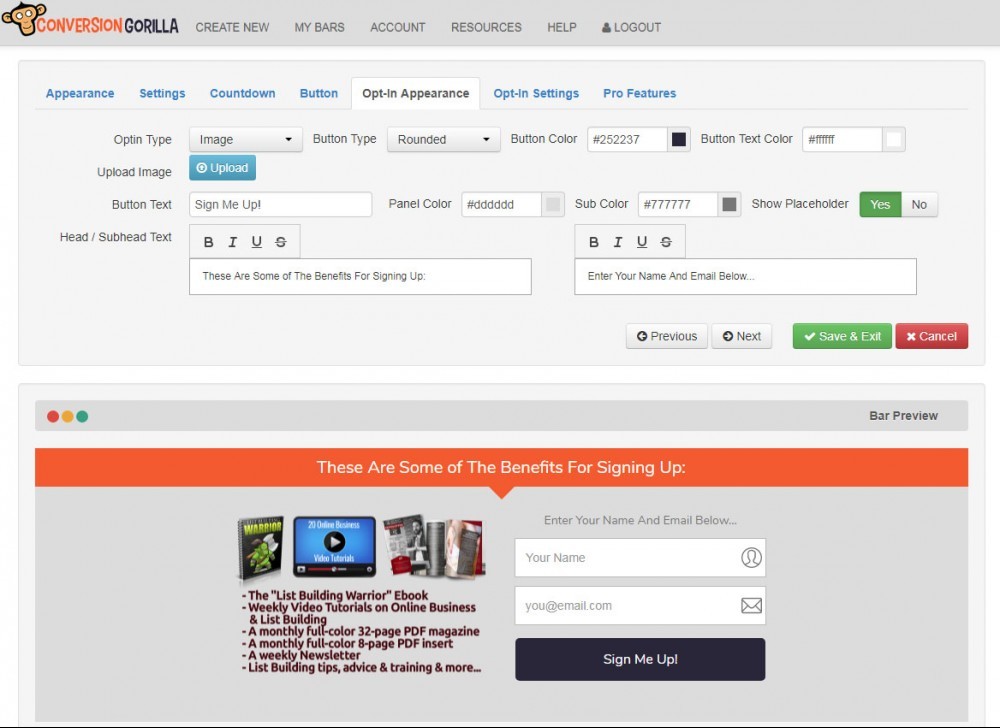
This is the tab where you set up what the opt-in form will look like once it appears.
The Optin Type can be Standard (just the opt-in form appears), Image (where an image appears to the left of the opt-in form) and Video (where a video appears to the left of the form).
In my example, I’ve chosen to use an image which shows some of the things subscribers will get.
Otherwise, this tab is very like the Button Tab with similar settings for colors and Button Text.
You can also change the Panel Color (I left it at the default gray color) and the Sub Color (the color of the Enter Your Name And Email Below… text)
If you’re going to use an image, it’s best to use a transparent GIF or PNG file so that if you decide to change the Panel Color, you won’t have to change the image to match in an image editor.
Opt-In Settings Tab:
Like the Opt-In Appearance Tab, this tab only appears if you’ve bought the Lead Machine Upgrade.

This is where you integrate your opt-in form with your autoresponder service. All the popular ones are catered for and for less popular ones, there’s an option to enter custom integration code.
Obviously, my autoresponder here is Aweber. Since I’d already set up my autoresponder service on my Account Page, all the lists in my Aweber account are available for selection in the Aweber List dropdown.
If you use a different autoresponder, you’ll see a different set of options, specific to that service, on this tab.
You can see what email list I selected in the screenshot above.
After Submit lets you either:
- Show Message (like a “thanks for subscribing” message) or you can ask them to confirm they want to subscribe by clicking a link in the email they’ll receive (sent automatically by your autoresponder service).
- Redirect them to another page. This could be to an upsell or other product offer. Or it could be to a Thank You page you specifically create for your subscribers.
If you don’t want your opt-in attention bar to appear again to a visitor who subscribes to your list, set Reshow Bar to No. There’s not much point in asking a subscriber to repeatedly subscribe every time they visit your page.
Pro Features Tab:
This is the final tab and it is only available if you buy the Pro Version upgrade. But I wanted to show it to you so you understand what it offers.

There are only 3 settings on this tab, but they are powerful features.
Remove Branding – ordinarily, an attention bar appears with a conversiongorilla.com logo in its bottom right corner. If you enter your affiliate ID into the tool, then this becomes your affiliate link.
However, the logo can impinge on buttons if the bar text is very long. You might also not want to distract visitors from what your bar is advertising, and would prefer that the logo didn’t appear.
Clicking the Yes option on Remove Branding will do just that, leaving your bar looking cleaner. You will lose out on the possibility of affiliate commissions for Conversion Gorilla though.
Show Bar Over 3rd Party Site – this is where you enter the web address for a page you don’t own but want to direct people to and you want them to see your attention bar on that page. Like the Hollywood Reporter example I talked about earlier in this post.
This is the option that really opens up Conversion Gorilla, allowing you to add attention bars to any web page you want.
Page Title For Overlay URL – this is optional but lets you put a title on your attention bar page. This title will appear when a visitor hovers their mouse over the browser tab that displays your page or when you share your page on social media.
Here’s a video showing how easy it is to us Conversion Gorilla to create attention bars:
My Opinion of Conversion Gorilla
Now that I’ve shown you demonstration pages of putting an offer on a Hollywood Reporter page (https://conversiongorilla.link/o/865/3439/) and putting an opt-in form on the same Hollywood Reporter page (https://conversiongorilla.link/o/865/3441/) and shown the process of creating an opt-in attention bar, it’s time to get down to the nitty-gritty of whether Conversion Gorilla is a worthwhile tool or not.
The basic tool can only be used to place attention bars on your own web pages.
The opt-in attention bar I walked you through above is active on this very site.
You can see it at the bottom of any page.
And, as a method of putting an opt-in form in front of visitors in a way that they’re not blind to, it certainly works.
When you’re creating opt-in bars to use on other people’s websites (with the Pro Upgrade), you really need to match your list very tightly to the topic of the page you’re sending visitors to.
So there’s no point in putting an opt-in for your Cat newsletter over a page that talks about video games. Sure, there are video gamers who like cats and you might pick up a few stray subscriptions this way. But you’d be far better off if you had a list targeted at video gamers.
This is a very powerful feature as you can get subscribers both from your own web pages and any other page on the internet you care to send traffic to.
Think about putting opt-in forms over pages on sites that get a lot of traffic. They’re more likely to be shared on social media. And the more your opt-in attention bar page is shared, the more chances of you getting subscribers.
You can use this strategy too if you sell your own products and are trying to get more customers onto your list. Once they’ve subscribed, you can pitch them on your product and services.
As I mentioned, the primary use for Conversion Gorilla is to sell affiliate offers from attention bars on your own web pages. You can add specific bars to specific pages so that only an offer appropriate to the topic of the page will appear to a visitor.
With the Pro Upgrade, you can add offers related to the topic of the destination page. This is what I do for my various Facebook pages. I post a couple of links created in Conversion Gorilla to my timeline and pages each day. Takes about a minute to set up a page and from there on out, someone else’s content can generate income for me.
Now let’s talk about the effectiveness of Conversion Gorilla
Opt-in pages need extensive testing to get them to perform really well. This is a process called split testing. And when you hear that some marketer gets a conversion rate of 50% on his squeeze page, you know that didn’t happen by chance.
Two versions of a page are tested to see which one performs better. The badly performing page is discarded and a new variation of the successful page is created and the two pages are tested against each other.
This process is repeated until a highly converting page results. This is how all the top marketers do it. They don’t just throw up a squeeze page and leave it.
You need to do the same with the opt-in bars you create in Conversion Gorilla. Change colors, text and placement and try to get better converting bars over time.
You can do the same with affiliate offers. Try promoting two different products, see which sells better and then test a new product against the better selling one. Rinse and repeat.
Most people are now very familiar with seeing opt-in forms in sidebars or in popups of one type or another.
I know of people who, if they see a popup on a site, will leave immediately and never come back, they hate them so much.
Conversion Gorilla gives you the option to place a more discrete optin-form on your sites in a way they’re not familiar with. So they’re more likely to take notice of them and less likely to skedaddle from your site.
In fact, they’ll only see the optin form if they specifically take action by clicking the button on your attention bar. The optin-form isn’t in their face the way it is with popups.
So, in terms of uniqueness of presentation of an optin form, Conversion Gorilla gets a big Thumbs Up.
A lot of the effectiveness of your bars will come down to the text you use on them. It’s a bit like the text you use in email subject lines. You need something intriguing, funny or compelling that will get them to click that button.
Ease of Use
The software is very easy to use as I hope I’ve demonstrated. The various options are broken out into several tabs so you don’t get overwhelmed by them.
It’s all mostly point and click with a bit of typing for attention bar and button text.
The tool is rock solid in terms of use and I haven’t discovered any bugs in the time since I started using it.
Pros
- As a basic tool it provides a unique way of adding affiliate offers to your web pages and sites
- You can also add opt-in forms to your own sites, though you do need to buy an upgrade for this feature
- You can add attention bars to any web page out there, but again you need to buy an upgrade for this feature
- The paid upgrades are very reasonably priced
- You can add your Conversion Gorilla affiliate link to your attention bars
- You can add countdown timers to bars to push people into action before the countdown goes to zero
- Using basic message bars you can inform your readers about whatever you want
- There’s no limit on the number of attention bars you can create
- All your attention bar pages are hosted for you at no additional cost
Cons
- Probably a minor issue but your settings are not auto-saved as you switch between tabs. They are remembered, yes, but if you leave the attention bar creation or edit screens (by clicking the Account main menu link for example), you are not asked if you want to save your settings. You’re simply taken to the new page and all your settings are lost.
- There’s no Save option so you can’t simply save your current settings. There’s only a Save & Exit option which will save your settings but take you out to the Dashboard. If you want to make more changes, you have to edit your attention bar.
- Another minor issue – I wish there was consistency in the Dashboard buttons and their placements across all of Promotelabs products. If you use one tool for any length of time, you get used to where the buttons are for it and if you switch to another of their tools you end up clicking the wrong button because of muscle memory.
- Two of the most useful features in Conversion Gorilla – the ability to create opt-in attention bars and the ability to add attention bars to any web page on the Internet – are only available through paid upgrades.
- Being able to use social sharing bars also requires a paid upgrade. However, I find that this is a very limited feature as your bars can only share to one social media network at a time. While I bought the upgrade, I’ve never used it. There are better and free ways to share socially.
- You do need to spend a bit of time creating your attention bar pages.
- The Dashboard is a monolithic list of all the pages you’ve created. You can’t organize them in any fashion. There are no folders you can move similar bars into. So using a naming convention is very important to being able to find and identify your bars weeks and months after they were created.
- When posting your attention bar page links on social media, no image is pulled into the post. So, ideally, you would need to upload an image first and then add your link into the social media post.
The Upgrades
At the time of writing, there are three upgrades available:
- Pro Version Upgrade – allows you to created an unlimited number of attention bars (instead of the 10 the Basic version allows), get unlimited clicks and unlimited sign-ups. Also gives you the ability to add attention bars to any web page online and lets you remove the Conversion Gorilla branding from your bars if you want to. Definitely worth getting if you want that feature set.
Lead Machine Upgrade – gives you the ability to create opt-in form attention bars that are integrated with your autoresponder service.If you’re interested in building a list and getting subscribers, this upgrade is definitely worth getting.This is now included in the basic version of Conversion Gorilla.Social Bars Upgrade – allows you to create social share attention bars. But I don’t think this upgrade is worth getting. Maybe I’m missing a trick here but there are other free ways to do social shares.This is now included in the basic version of Conversion Gorilla.
My Bonuses
Here are my 10 bonuses, worth over $2,000, if you decide to buy through any of my links. If you order any of the upgrades, you’ll receive an additional 7 bonuses (worth $359).

Conclusion
I do think that Conversion Gorilla is a tool worth having.
Of the three upgrades available, the Lead Machine Upgrade is definitely the one to get. The Pro Version Upgrade is certainly worth consideration while the Social Bars Upgrade can be ignored.
It’s a tool I now use almost daily.
I hope that from this Conversion Gorilla review you’ll find it equally useful. What other way do you know of to get subscribers to your list by promoting other people’s web pages?
If you have any questions, thoughts or comments about this review, sound off below…


All the best,
Gary Nugent
Check out my Instagram posts and reels here:P.S.: Don't forget, if you want to create an internet income of your own, here's one of my recommended ways to do that:
I have seen many of these bars on different websites but I did know how these guys were adding them to their posts and pages. Now, it makes sense.
From your review I can understand how the tool works and why they use it.
One question, is there a big increase in conversions from a simple email box on the sideline?
Hi Ilias, I’ve been getting more signups since I added the attention bar to the bottom of my posts. It’s not the only way I drive traffic to my newsletter page but I think the novelty factor is catching the eye of my visitors. Many people are now blind to the usual ways that optin forms are presented.
The other factor is that visitors have to click a button before they can sign up. So that’s an explicit action on their part looking for more information. That makes them more pro-active in signing up and that’s probably the reason I’ve seen more signups recently.
Simple design is often better than a bells-and-whistles approach. There’s less to distract the visitor from the action you want them to carry out – in this case filling in a form.
Of course, the number of subscribers anyone will get to their list relies very heavily on the amount of traffic being sent to the optin form or squeeze page and the quality of content you’re offering in exchange for their email address.
Hi Gary,
You must bear with me – I’m pretty new to E-mail marketing and never heard of Conversion Gorilla before.
My understanding, in simplest terms, is that Conversion Gorilla helps me convert prospective customers by offers made through an opt-in form. Am I on the right track here, and must I own a website?
Hi Vincent. Conversion Gorilla helps you promote affiliate offers directly on your attention bars (and get better conversions) or it can be used to convert visitors to the page you’re sharing into subscribers to your mailing list(s). Once people have subscribed, then you’d send them offers and valuable content as I outline in this post.
Hi Gary,
This kind of bar is what I have been looking for, one that will collect subscribers from many of my visitors. From reading your review you say that you can collect subscribers from other websites? Is this ok to do, legal I mean…!
I have websites in other industries and this tool could be a big boost to my list building techniques if this is the case fantastic.
Cheers,
Patrick
Thanks for stopping by, Patrick. When you’re using these attention bars, you’re sending visitors to a web page you own (where the attention bar is embedded). Also embedded on your page is the content from a web page somewhere else on the internet. As far as I’m aware, this is done using iframe technology, a very commonly used technique online. Using iframes, you can embed content on your Facebook timeline, on your FB pages and in FB groups too. So there’s nothing underhanded about the technology.
You could maybe argue that it’s unethical to use someone else’s content this way, but the original content still gets shared by you so it still gets exposure. And people can still leave likes, shares and comments on it as normal. The original content is embedded in your page, not a copy. You could look at showing the attention bar as a kind of reward for sharing their content.
As I mentioned in the review, it’s best to match your attention bar to the topic of the page or site you’re sharing with your visitors. You’ll get a much better conversion rate that way.
Hi Gary, this sounds like a very interesting tool to use for marketing. Are there any potential concerns with adding the conversion bar to another person’s website? With the EU Cookie law deadline coming up in a few days – does it add cookies to their website or would that be part of the Monkey Conversion site since it is now hosted there. I have lost about a weeks worth of sleep trying to get compliant on our blog and websites, as we have some visitors from the EU, even though we are based in Canada and its a personal blog site!
Hi Tara. You don’t get the email address or any personal info for a visitor who clicks on your attention bar, so there are no privacy issues there. Your attention bars are hosted on Promotelabs’ servers but they don’t record (as far as I’m aware) any personal info of people going through your attention bars. If they did, they’d be the ones who would have to be GDPR compliant, not you. The attention bars that Conversion Gorilla creates are essentially very fancy cloaked affiliate or optin links.
No cookies are added to a visitor’s PC if they go to a page through your attention bar. However, a cookie would most likely be added to their PC by the merchant if you were sending a visitor to an affiliate offer (this is what happens anyway, regardless of GDPR).
If you are collecting email addresses and names for building a list, then you would need to be GDPR compliant where EU citizens are concerned. But you’d have to be compliant anyway if you were getting subscribers signing up directly on your squeeze pages rather than them signing up through an attention bar.
So GDPR compliance doesn’t have any bearing on the Conversion Gorilla attention bars.
Have you checked out the (free) WP GDPR Compliance plugin? It makes getting your WP blog compliant much easier.
Wow, this little program is really cool!
Didn’t know about it until I “bumped” into your blog, and am glad I did.
I am sure it will be beneficial for many…and me!
Thanks for sharing =)
There are so many great tools out there, Orion. There’s a lot of bad ones too but I try to review only the best tools. 🙂