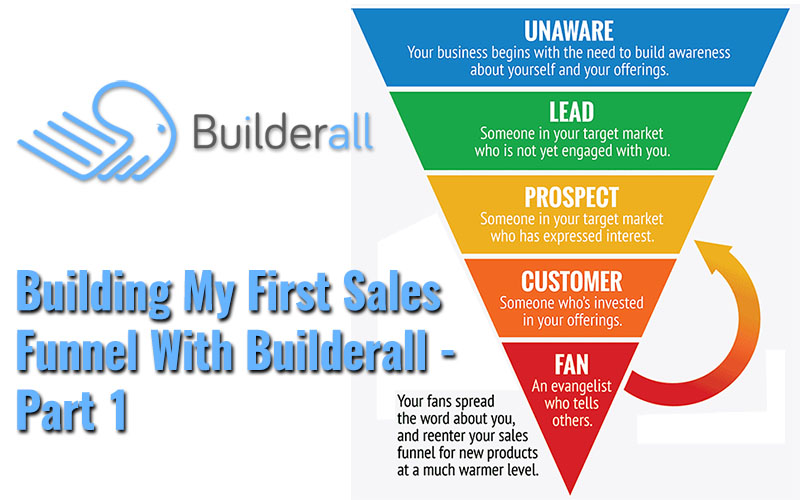
Introduction
All my current sales funnels have been built with Clickfunnels but I recently subscribed to Builderall to build new funnels.
Why?
Because on the Basic $97/mth Clickfunnels plan I’m on, I can only build 20 funnels or 100 pages before I hit the plan’s limits.
And, guess what?
I’ve repeatedly hit those limits and they’re preventing me from expanding my business.
It’s surprisingly easy to reach those limits, especially when using shared funnels – funnels that are created by other Clickfunnels users who allow you to copy, edit and use their funnel.
Each funnel comes with a number of pages.
The simplest has two pages – an optin or squeeze page and a thank you page.
A full funnel should also include a Privacy Policy, Terms of Service and Disclaimer/Disclosure page to comply with FTC regulations and Google requirements.
So a basic funnel consists of 5 pages.
More complex funnels may contain additional training pages, a sales page, a confirmation page (if you’re collecting emails with double-optin), bonus pages, membership pages, alternative optin pages, alternative thank you pages, and so on.
So yeah, that 100 page limit gets reached pretty fast.
Since I didn’t want to pay $297/mth to Clickfunnels to build an unlimited amount of pages and funnels, I looked around for an alternative and settled on Builderall.
Out of the gate, there are no restrictions on how many assets you can create, whether that’s pages, websites, funnels, membership sites, chatbots and other doodads you can create with Builderall’s 47 tools.
But this post isn’t a review of Builderall, it’s about how I built my first funnel with it.
How Pages Are Constructed
Builderall and Clickfunnels take entirely different approaches to how how pages are created.
Clickfunnels uses a block builder which is a simplistic visual approach to placing elements on a page that’s great for the non-techy person.
However, it’s also a crude way of building pages that doesn’t allow you to place page elements exactly where you want.
Builderall, on the other hand, uses a drag-and-drop approach.
You place a page element on a page and drag it exactly where you want it, right down to the pixel.
Each page element is also in its own layer and you can re-order the layers to achieve the look you want.
For example, you might want an image to partially cover or be behind another page element.
This is something you can’t do with Clickfunnels.
My Builderall Subscription Plan
Builderall has three plans:
- Cheetah – their least expensive plan is $14.90/mth but doesn’t give access to all the tools in its suite. This plan is best suited to email marketers.
- Premium – this plan gives unrestricted access to all of Builderall’s 47 tools and is $79.90 per month. So, less expensive than Clickfunnels with a lot more tools included. However, you don’t get access to any page, site, funnel, etc templates with this plan.
- Funnel Club – their top plan which has everything in the Premium plan but also gives you access to hundreds of templates (with new ones being added each week). This one’s $199 up front and then $79.90/mth thereafter. Since I wanted access to the funnel templates, this is the plan I subscribed to.
Picking What I Wanted To Build The Funnel For
So I needed something to build a funnel for – something to promote.
I wanted a program that I’d not promoted before so that I wouldn’t be carrying over any preconceptions or design ideas from a previous sales funnel.
I talked about two programs in the cryptocurrency niche in previous posts – iCoinPro in Part 1 and Cash FX in Part 2 and, initially, I intended to promote iCoinPro.
However, part of that promotion involves building a bonus page and finding quality bonuses for that page, and it was going to take longer to build a full funnel for that than I wanted to put time into.
So, ultimately, I decided to promote the Cash FX program instead.
This is more of a Forex (foreign exchange) program than anything else but you can only make deposits and take withdrawals from it with Bitcoin, so that’s why it’s cryptocurrency related.
Now, I know nothing about Forex, so there’s no way I could write knowledgeably or authoritatively about it for an optin page or a sales page.
This is probably something a lot of marketers face when they find a program they’d like to promote but don’t know much about the niche.
Builderall To The Rescue
Knowing I wanted a funnel in the Forex/crypto/finance niche, I took a look at Builderall’s funnel templates and found one in the Info Product Funnels section based around Forex, so I downloaded it into my Builderall account:
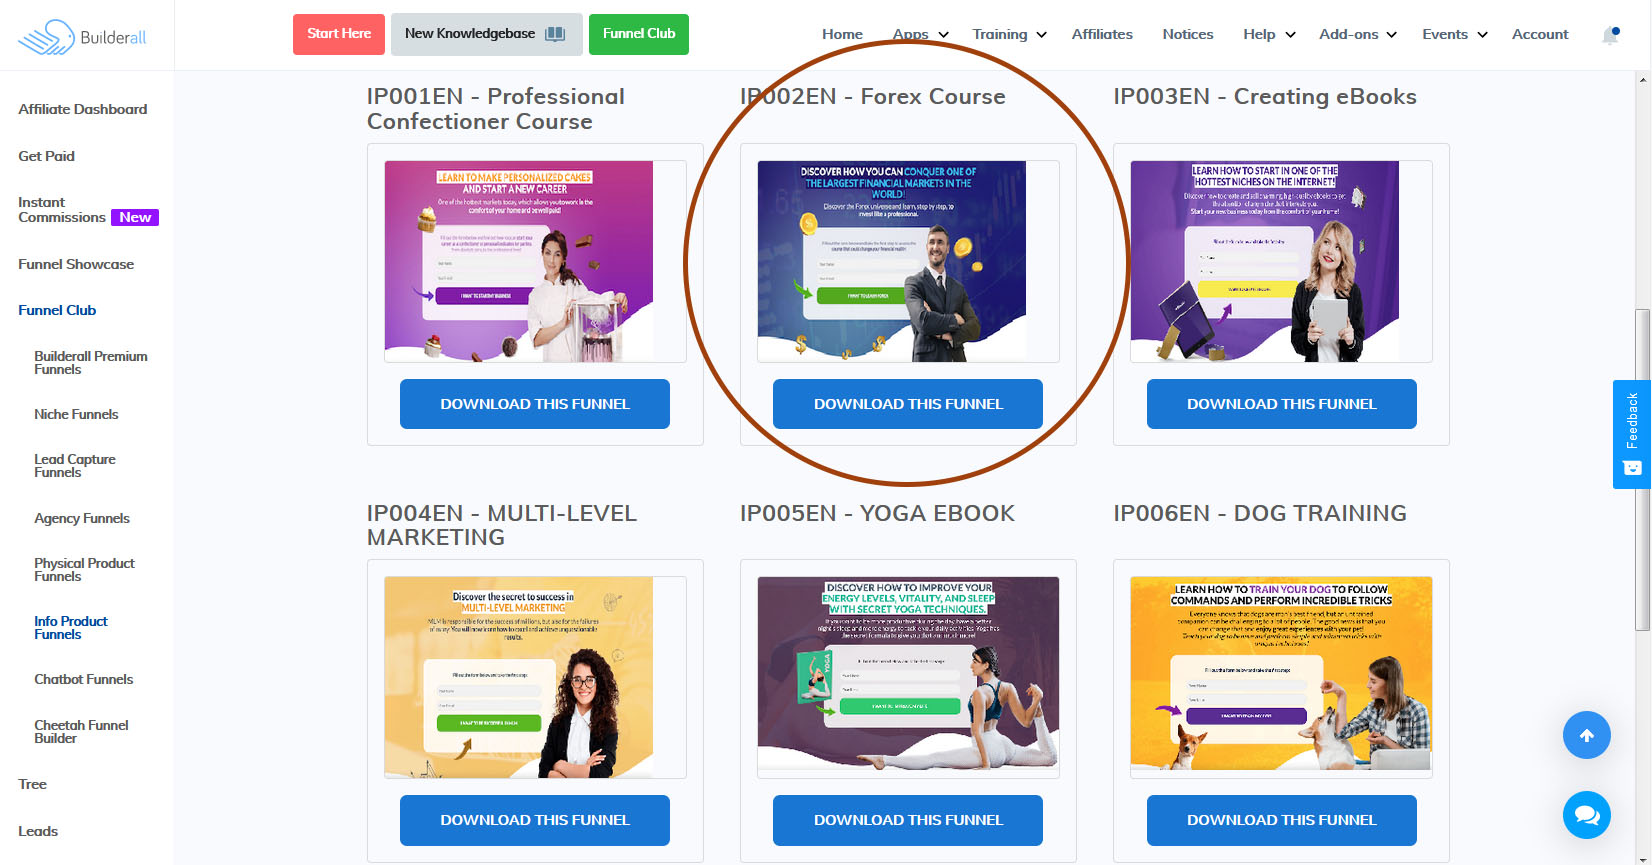 Click the image for a full-sized view
Once the funnel was downloaded, it was opened in Builderall’s Cheetah Website Builder.
This funnel consists of three pages:
- a Home page – the optin/squeeze page
- a Pending page – this tells people to click a link in an email they’ve received to confirm their subscription (for double-optin)
- a Thank You page – the page where you give subscribers the information, freebie or lead magnet they’ve signed up for
This was what was in the Cheetah Website Builder after I downloaded the funnel:
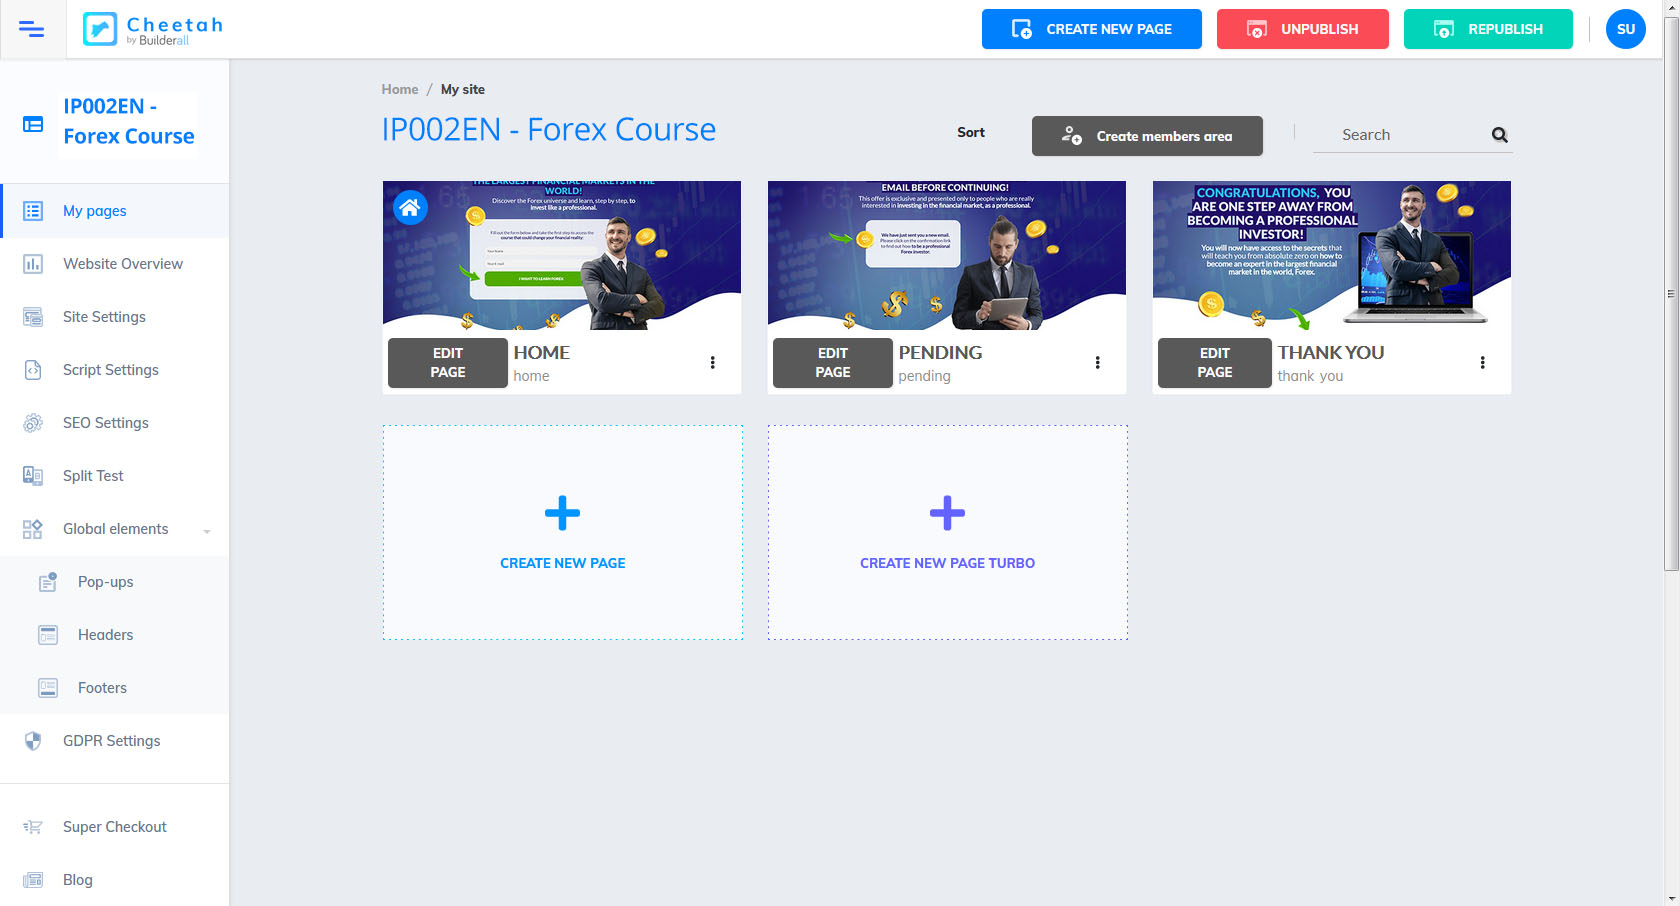 Click the image for a full view
Editing The Squeeze Page
The first page I wanted to start editing was the Home (squeeze) page.
This is what the page originally looked like when I first opened it (some of the various elements that you can add to pages are down the right side of the image):
 Click the image for a full sized view
That’s a pretty good page design (let me known in the comments if you think otherwise) but I wasn’t happy with it as is.
The headline and sub-headline needed to be changed as did the tagline in the form.
I also wanted to change the text on the button so that visitor’s wouldn’t know immediately that this was a program related to Forex.
I wanted to up the mystery about the program that was being mentioned on this page.
I also wasn’t happy with the image of the guy because it’s kind of blurry and looks like an image that’s been enlarged above its original size.
So I changed all the text on the page and searched for a royalty free image I could use in place of the guy and replaced that image with the new one.
Pictures of women attract more eyeballs than pictures of men so I decided to use the picture of a young smiling woman instead.
I also wanted to add a disclaimer about potential earnings to the page so people wouldn’t have unrealistic expectations of the program.
I also added a checkbox to the form that visitors have to click to say that they’ve read that disclaimer.
Adding the disclaimer meant that I had to move various page elements up to page to make space for it.
This is what it looks like after the edits:
 Click the image for a full-sized view
With my editing done, I published the finished page so it was live online.
Pages are hosted on the builderall.com domain unless you specify a domain that those pages should appear on.
Builderall allows you create funnels on 15 unique domain names but you can created an unlimited number of subdomains to host your funnels, on each of your domains.
I had an old domain name lying around that I’d never found the right product to promote with, but it seemed a good fit for this program – earnforexincome.com
It does give away that the promoted program is Forex related and I may change the domain name in the future to something a little more generic.
But, for now, I have a squeeze page on a dedicated domain name live online.
Connecting Up The Autoresponder
A squeeze page is only the first part in a sales funnel and its goal is to get visitors to hand over their email addresses for something in return.
That means you need something on the other side of the page that actually collects and store those email contact details.
And that’s an autoresponder service.
There are many of these third-party services such as Aweber, GetResponse, Kit and others (more are detailed here).
And, in fact, since Clickfunnels doesn’t provide an in-built autoresponder in its Basic plan, I’ve had to use Aweber to collect email addresses from the funnels I’ve built with it.
Builderall, on the other hand, does have its own inbuilt autoresponder, called Mailing Boss.
It took me a while to get used to how this works as it’s quite different to Aweber in how emails and campaigns are designed, built and accessed.
There was also some terminology confusion.
Aweber calls an email an “Email”, a series of emails an “Email Sequence” and a specific email sequence that goes out to subset of people on your list a “Campaign”.
Campaigns are used for sending emails to a segment of people on your list and sending them emails based on tags which get applied to subscribers when they take certain actions like opening an email or clicking a certain link.
In Builderall, a “Campaign” is actually a single email while a sequence of emails is still referred to as an “Email Sequence”.
There doesn’t appear to be standard terminology being used by all the different autoresponder services and maybe you’re familiar with different terms if you use one of the other services.
With the confusion out of the way, I was able to create a new list in Mailing Boss and hook it up to the form on my squeeze page.
Now, one of the things I really miss with Aweber is a visualization tool that shows me at a glance how the various campaigns I’ve set up on one list link and flow into one another.
Builderall has what it calls a Workflow Tool which sets up your list and email sequence outline for you.
I used it to create a new workflow (called Cash FX) which involved creating a new list (called CFX Power Team) and then I had to create an email sequence.
You can set how many emails you want to create and the Workflow tool will create the outlines of those emails for you.
If you need to add more emails or remove some, you can do that at a later stage.
There is no content in the emails – they’re effectively placeholders and you fill in the email subject lines and body with content when you want.
But what the Workflow tool shows is a visualization of how everything is connected.
This is what my workflow looks like:
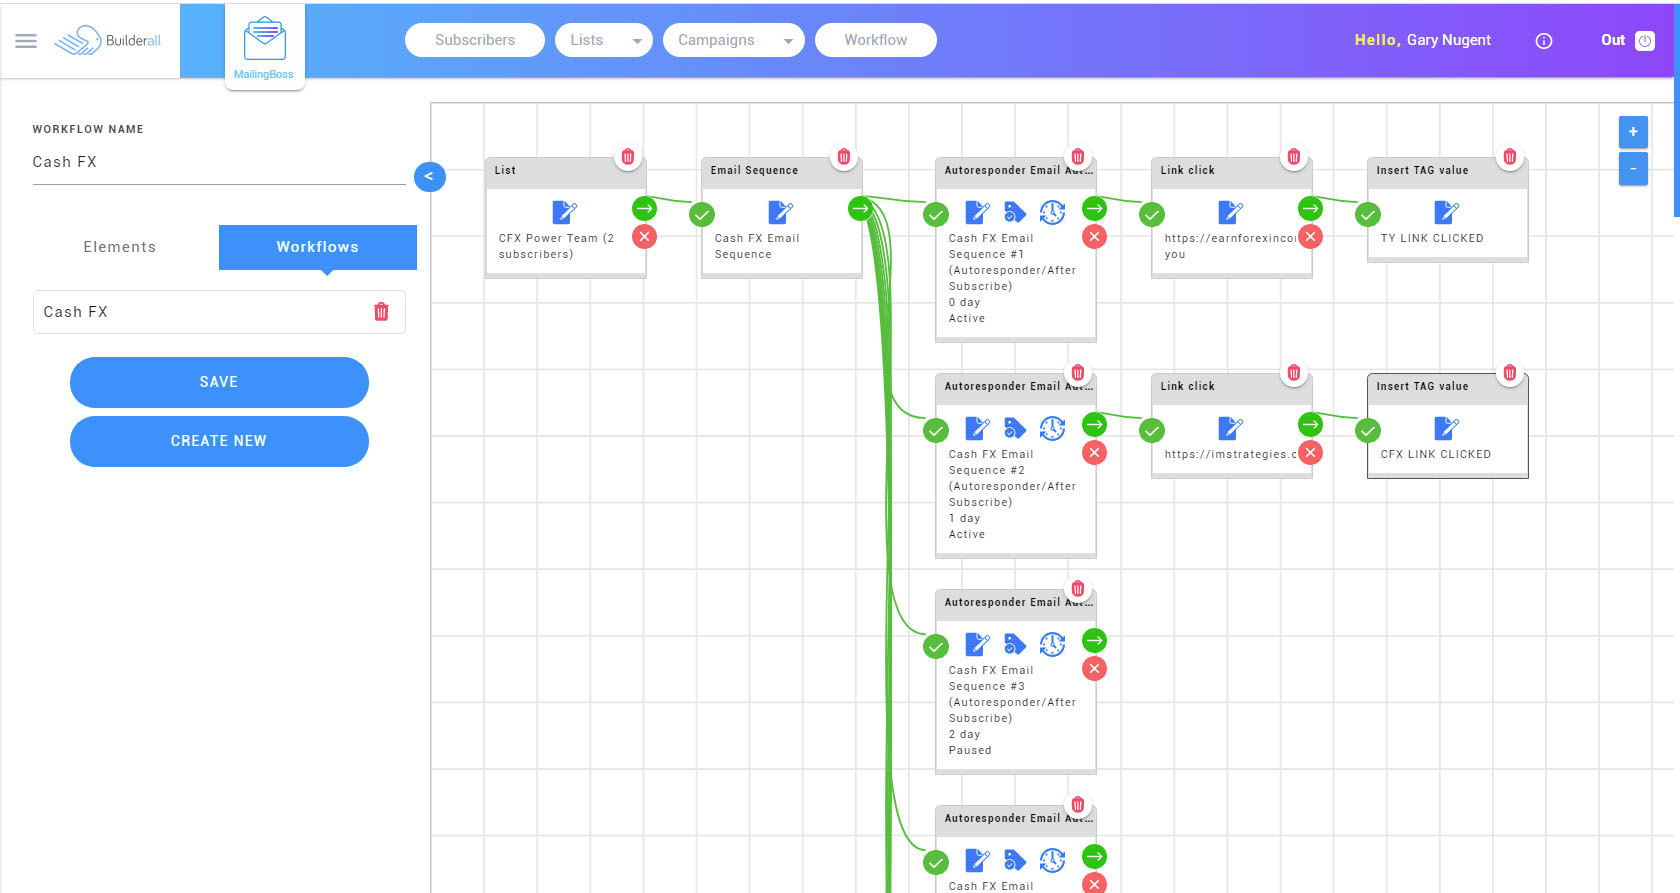 Click the image for a full-sized view
At the time of writing this post, I’ve only written two emails for my email sequence and made those two emails active.
That means that when someone signs up, they’ll be sent those two emails a day apart.
The other emails in the sequence remain inactive, so they won’t be sent out until I add content and make them active.
Here’s a closeup of the first email in the Workflow Tool:
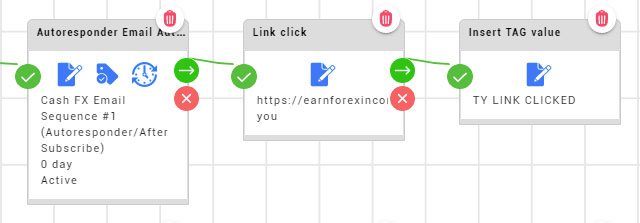
The left box shows the setup for the first email.
It shows the email title (Cash FX Email Sequence #1) – this is a notational field for you and is not the actual email subject line.
(Autoresponder/After Subscribe) tells you that the email sequence is triggered after someone signs up to your list.
0 day means that the email goes out immediately, as soon as someone subscribes.
All emails are scheduled to be sent out X days after the person subscribes to your list, so in my case, email #2 goes out on 1 day (1 day after subscribing).
I’ll be setting up future emails to go out on a daily basis, so email #3 with have 2 day in its box, email #4 will have 3 day in its box and so on.
You’re not limited to sending out emails every day. You can schedule them to go out at whatever intervals you want.
In Builderall’s case, when an email in an email sequence goes out is relative (in days) to when the subscriber signed up.
Aweber takes a different approach.
In their case, emails are sent out relative to the last email sent.
So email #1 goes out immediately when someone signs up; email #2 goes out 1 day after that; email #3 goes out 2 days after email #2, and so on.
I prefer Aweber’s method of scheduling emails in an email sequence, but maybe that’s because it’s what I’m used to.
Active in the left box in the above image shows that that email will be sent out to new subscribers.
Clicking the first blue Edit icon on the box opens up the email for editing so you can change the email subject line and/or email body.
The middle Tag icon allows you to add tags to your email.
This would typically be a tag to say someone had opened your email which allows you to segment your list into people who open your emails and those who don’t.
You can then send them different emails based on those tags, perhaps reminding the non-openers to open your emails to get your free gift, training or whatever.
Or, after some time, you can send the non-openers an email telling them that you’re about to kick them off your list since they’re not opening your emails.
Click the Clock icon to change the scheduling of that particular email.
At the right of the box is a green right-arrow; clicking this will open some additional options:
![]()
The only option relevant to this discussion is Link Click.
This allows me to track what links in my emails subscribers have clicked.
When you click the option, you’re presented with a list of active links that appear in your email.
Select the one you want and a new Link Click box will be added to your Workflow.
Click the right arrow on that box and you’re presented with another list of options:
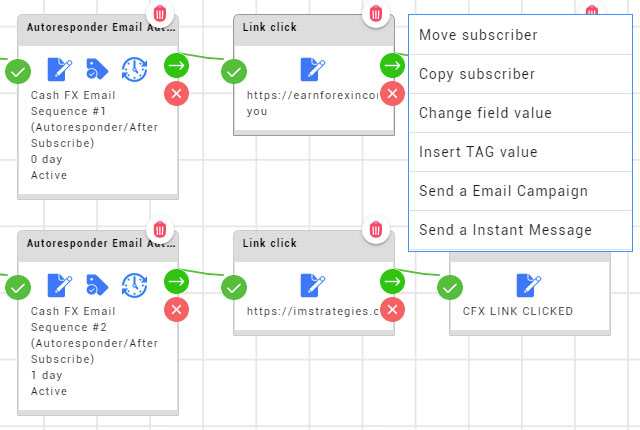
The option we’re interested in is Insert TAG Value.
This lets you add a tag that tells you that your subscriber has clicked a specific link in your email.
So if we look at the setup for email #1 again…
…you can see that a TY LINK CLICKED tag will be added to my subscriber if they click the specified link in my email.
I can use this tag to send them additional emails or send them a free gift for being an active subscriber.
Your imagination is the limit here.
Conclusion
So, at the conclusion of Part 1 of this short series on building my first sales funnel with Builderall, I have:
- Edited the squeeze page for my funnel after downloading one of Builderall’s funnel templates. That’s meant…
- Changing the headline, sub-headline and tagline in the form section of the page
- Replacing the image of the guy with picture of a smiling woman
- Added a disclaimer to the page to meet with FTC guidelines
- Added a checkbox to the form which subscribers have to click to say they’ve read the disclaimer
- Moved some of the page elements upwards to allow space for the disclaimer
- Published the page so it’s live online
- Placed it on a dedicated domain name here
- Connected up the autoresponder which meant…
- Learning how to use Builderall’s Workflow tool
- Creating a new list in Buidlerall’s autoresponder
- Creating a new email sequence in the autoresponder
- Editing the first 2 emails to add subject lines, content and making them active
- Setting the first email to go out as soon as someone subscribes to my list
- Setting the second email to go out one day later
- Tagging link clicks in those emails
What’s Next
On the recommendation of Builderall, I’ve set my list up to be double-optin.
That means that once someone submits their name and email address, they’ll see a page telling them they’ve just received an email from me asking them to confirm their subscription request and that they need to click the link in that email to proceed.
You might think that putting a barrier like this in front of people will prevent some of them from following up on confirming their subscription.
And you’d be right.
But, while you end up with a smaller list of people as a result, the people who do confirm are already committed to hearing from you and what you have to offer.
That means they’re going to be more responsive than a list where you allow everyone to join.
And that translates into better email open rates and better click through rates on links in your emails.
You’re reputation with Internet Service Providers (ISPs) will go up and more of your emails will end up in your subscribers’ Inboxes than in their Spam folder (assuming the ISP doesn’t filter out your emails in the first place).
And, of course, that all leads to you making more sales of whatever you’re promoting.
So, in Part 2, I’ll be looking at creating the Confirm Your Subscription page and how that’s handled on the email side of things.
Related Posts:
- Building My First Sales Funnel With Builderall – Part 2 – creating the “Confirm Your Subscription” page.
- Building My First Sales Funnel With Builderall – Part 3
- What Is A Sales Funnel And Do You Need One For Your Business?
- How To Create A Squeeze Page The Stupidly Simple Way
- Is Builderall Worth It In 2021?
- Builderall As An Affiliate Marketing Opportunity
- Builderall 4.0 Launches Today And I Have Bonuses For You!
- 200 Things You Can Do With Builderall
Free Courses From Builderall
- Create Your Own Profitable Membership Site Today!
- Build Your Email List
- Create Your Own Profitable Course Today!
- Start Your Coaching Business
- Builderall List Building + Mailing Boss Tutorials

All the best,
Gary Nugent
P.S.: Don't forget, if you want to create an internet income of your own, here's one of my recommended ways to do that:


Hi Gary,
I am pleased I came across this article because I am in the middle of putting together my first sales funnel with my own products. I have my free e-book, my published book, an online course and then a full programme. All in the area of leadership , personal growth and influence. I am setting this up this weekend and hopefully it will work well.
Builderall does sound like a software that could help with this. So, I will try to do it myself and if I have any issues then I will take a look into builderall.
Thank you for sharing and keep up the great work with your sales funnel.
All the best,
Tom
Sounds like you’ve [ut a lot of thought into your funnel, Tom. The best of luck with it – maybe you’d come back and let me know your success with it?
One thing I found myself when building my first funnels is that if a funnel has more than a couple of pages, then it’s management became problematic.
Everything would be fine when I was initially building and editing the funnel, but if I had to come back to it after a few months to change it, then I’d have to spend time figuring out how everything hung together again so I didn’t inadvertently screw something up.
My stop-gap measure between that and Clickfunnels and Builderall was a funnel builder plugin for WordPress.
Great post and very timely as I am about to start building some funnels and had really never thought of any option outside of clickfunnels, and had never heard of builderall. Glad I came across your post, it appears this would save me money and provide me with all I really need to get a funnel up and running. Saving money is making money as they say! 🙂
I definitely think the edits to the squeeze page you made were bang on man, yours look much better and the lady will definitely result in more sign ups.
Also great to hear I can use my aweber account.
Thanks again. Cheers!
Thanks for the feedback on the squeeze page, Rob.
Since Builderall includes its own autoresponder, you don’t need to pay for Aweber unless you really want to keep it. That’s another bit of money saved each month!
I definitely think you’ll get a lot more value out of Builderall than Clickfunnels, even if you go for the top-level Funnel Club plan, which is about the same price as the Basic Clickfunnels subscription (that doesn’t even include an autoresponder).